Vcore 4 Endstop issue
I have tried everything i know how to at this point....
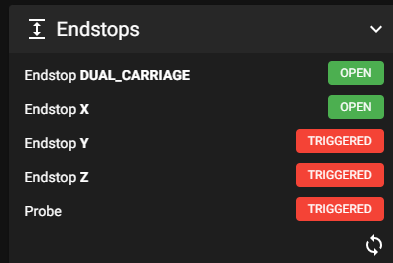
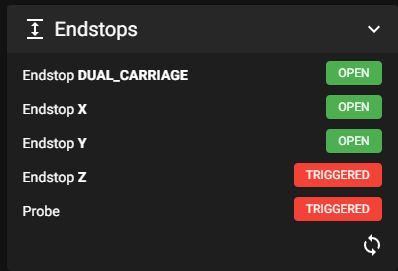
the y endstop is the one ive focused on trying fixing of the ones that say triggered.
I have tried a new cable for endstop Y. Still says Triggered
I have tried one of the other end stops that worked like the endstop X in its place. endstop Y till says triggered.
I have tried a new Cable for both end stops one that works and the one that is unsure at this point if it worked. both say triggered and dont change to open when clicked.
I have got a new octopus board and replaced the old one and still doesnt work.
I have checked the pin for endstop in the ratOS and it appears to be on the right pin.
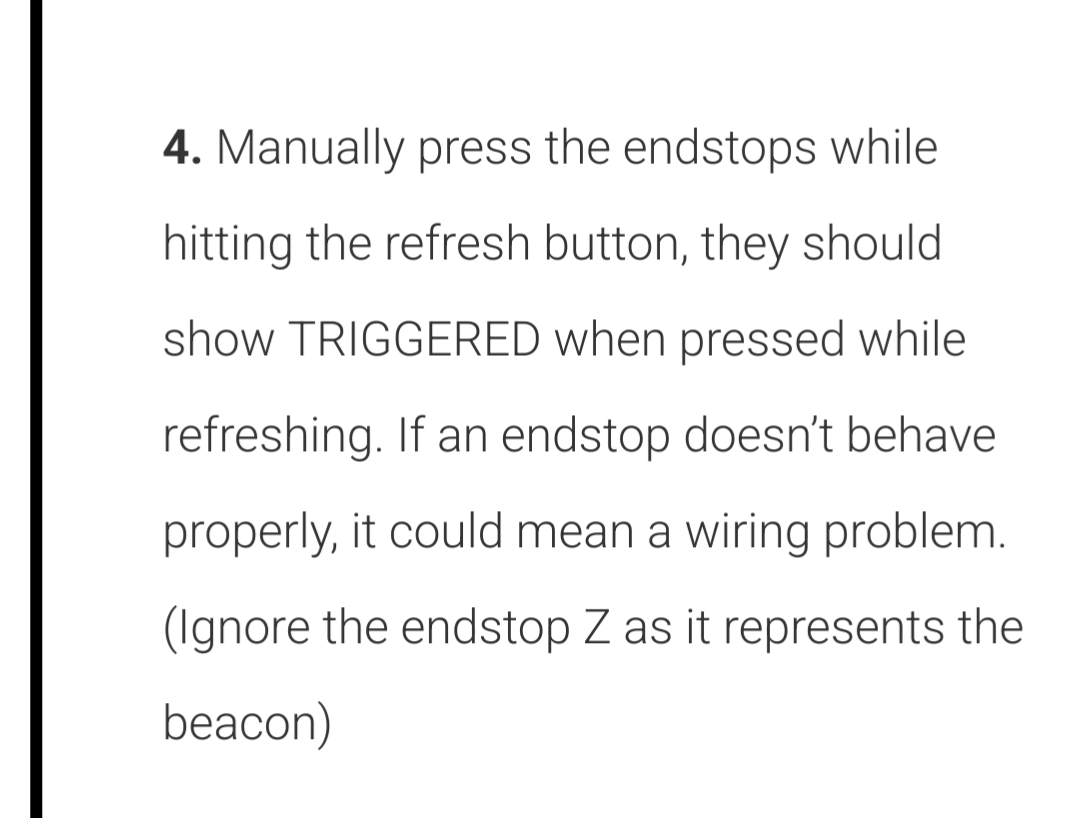
What else shuld I try? i cant home and when i do it says.
"Endstop y still triggered after retract"

158 Replies
Something is triggering it, obviously.
If you remove the cable from the endstop port on the board, does it still say triggered?
Yes still still says triggered
if you short the pins using a screw driver or other metal object... does it still say triggered?
Hmmm didn't try that... Do you know how I'd do that safely on a btt octopus v1.1?
Does it matter which of the 3 pins on the port are triggered? I guess I could just try 2 and then the other 2
Should I worry about shorting my board id assuming they are only 5v so no shock risk
I forgot these were not 2 wire endstops.
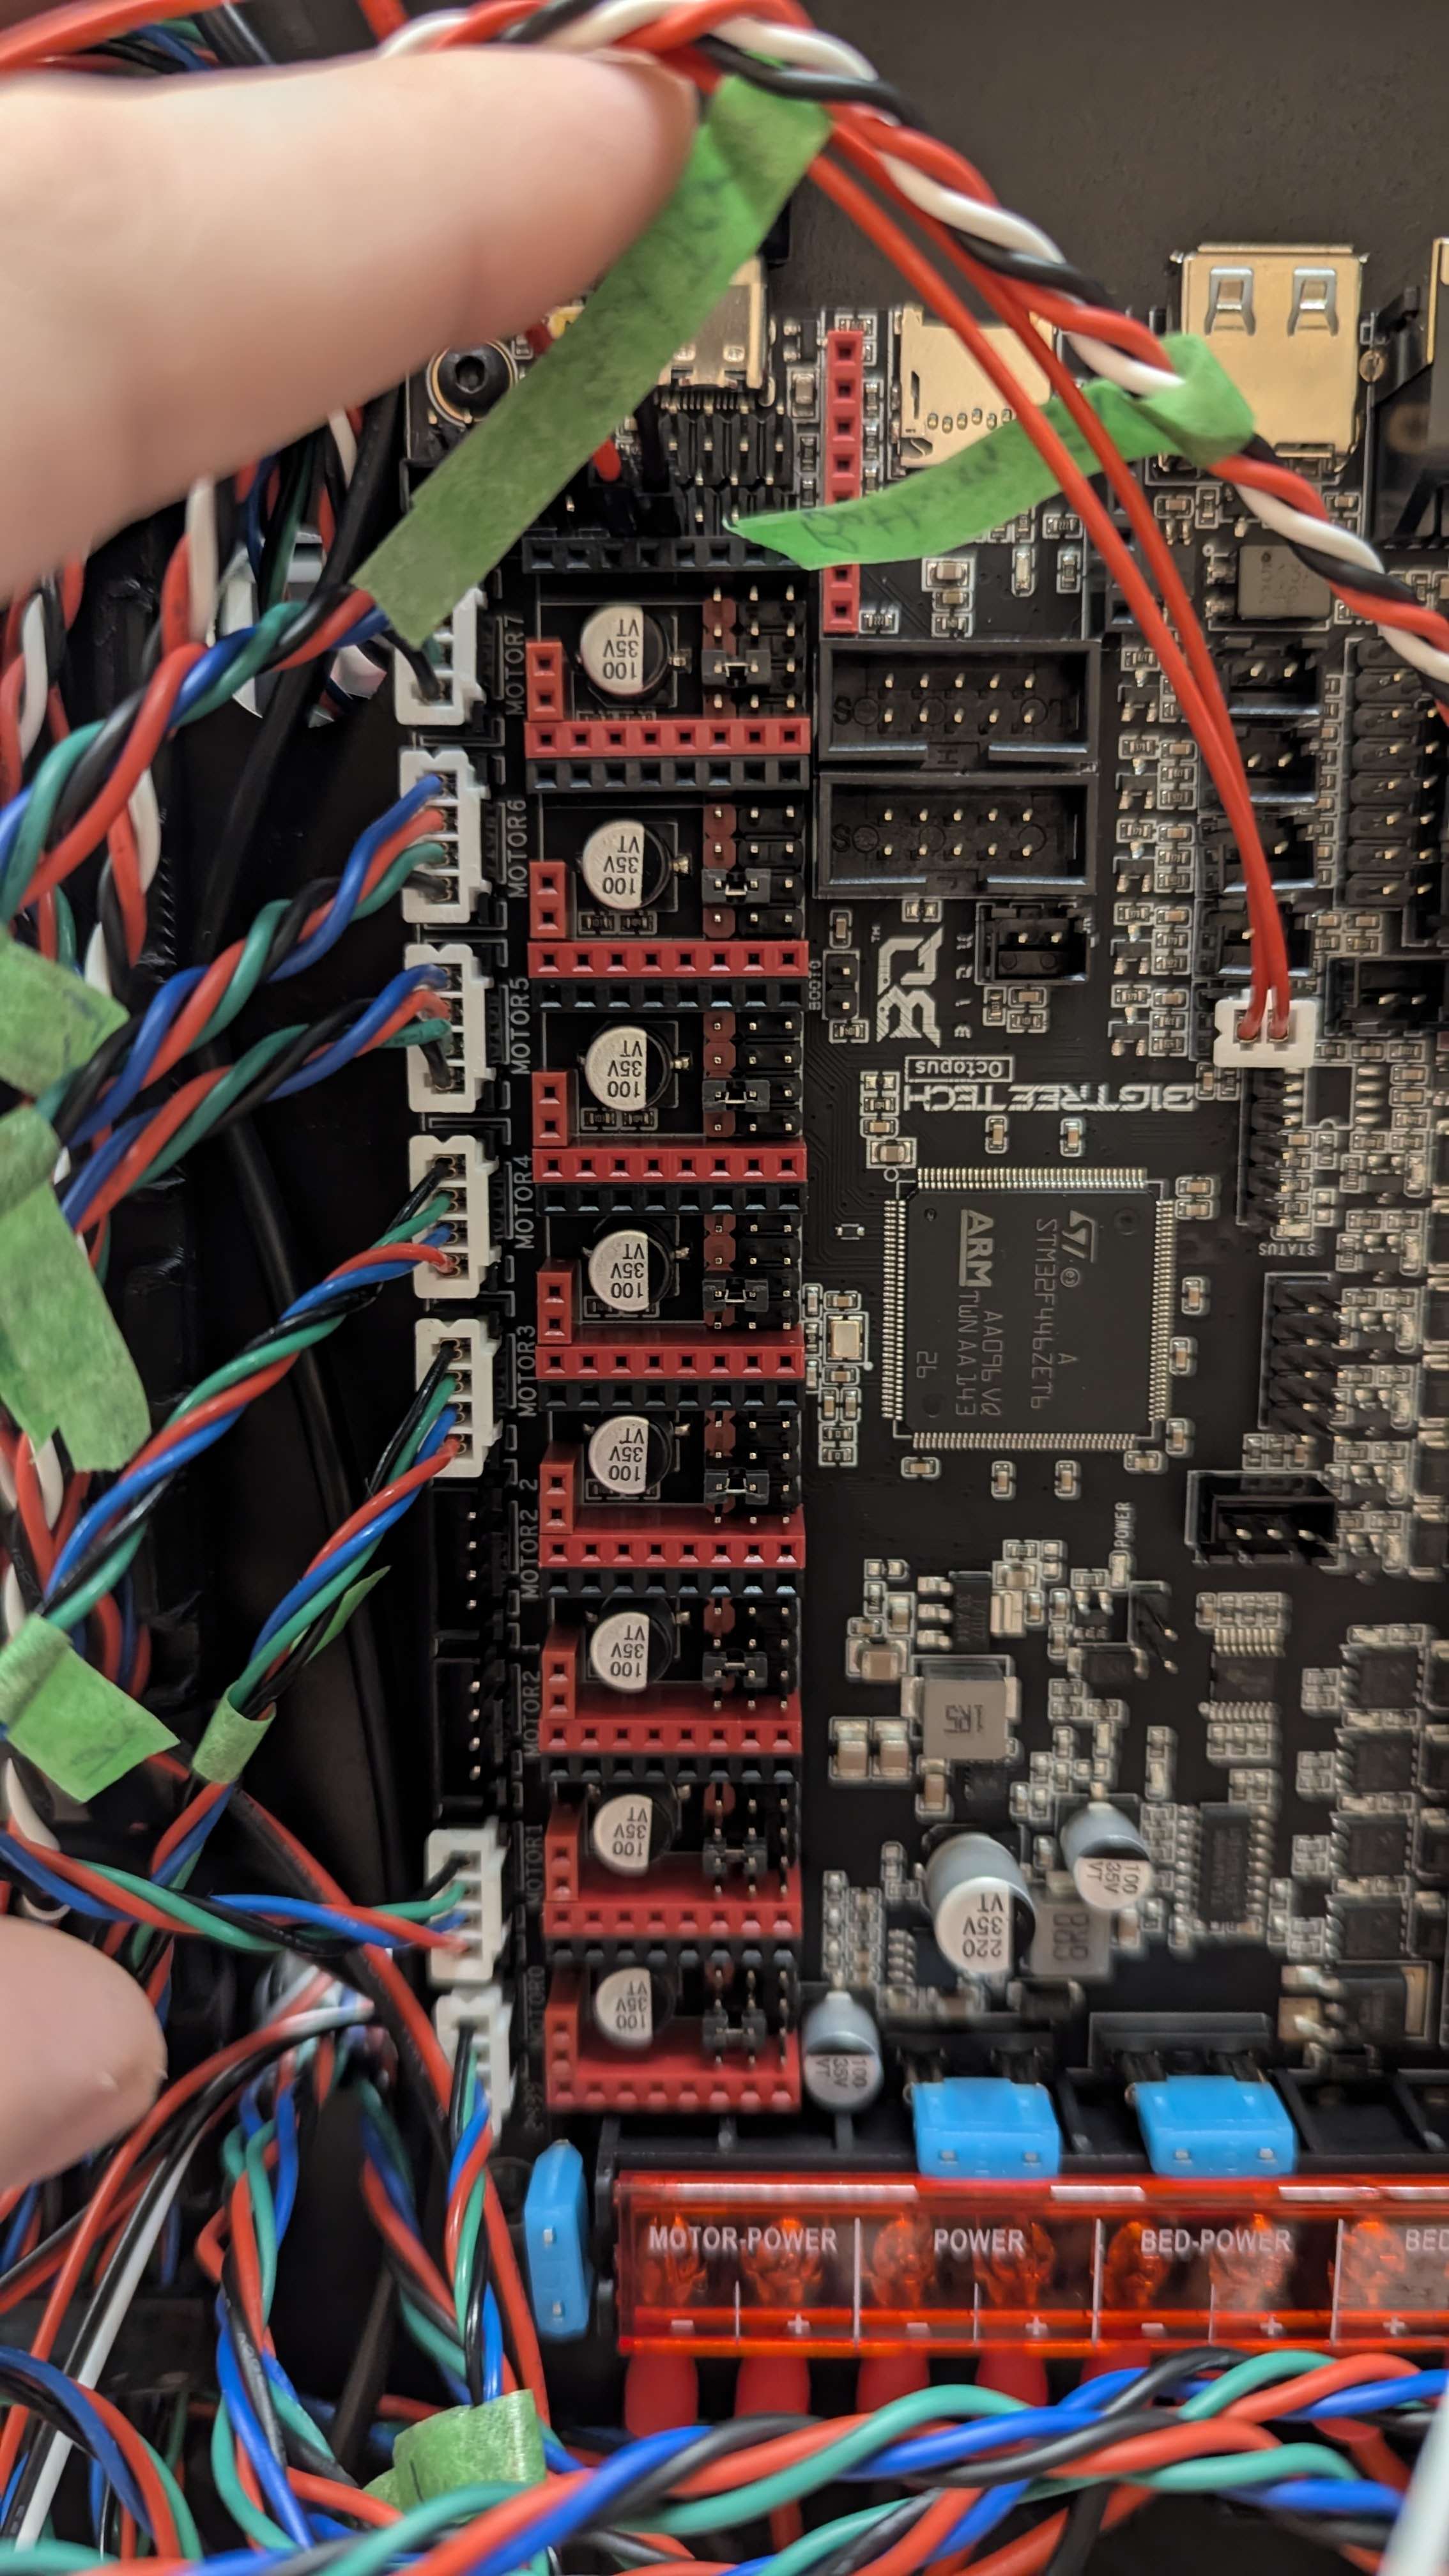
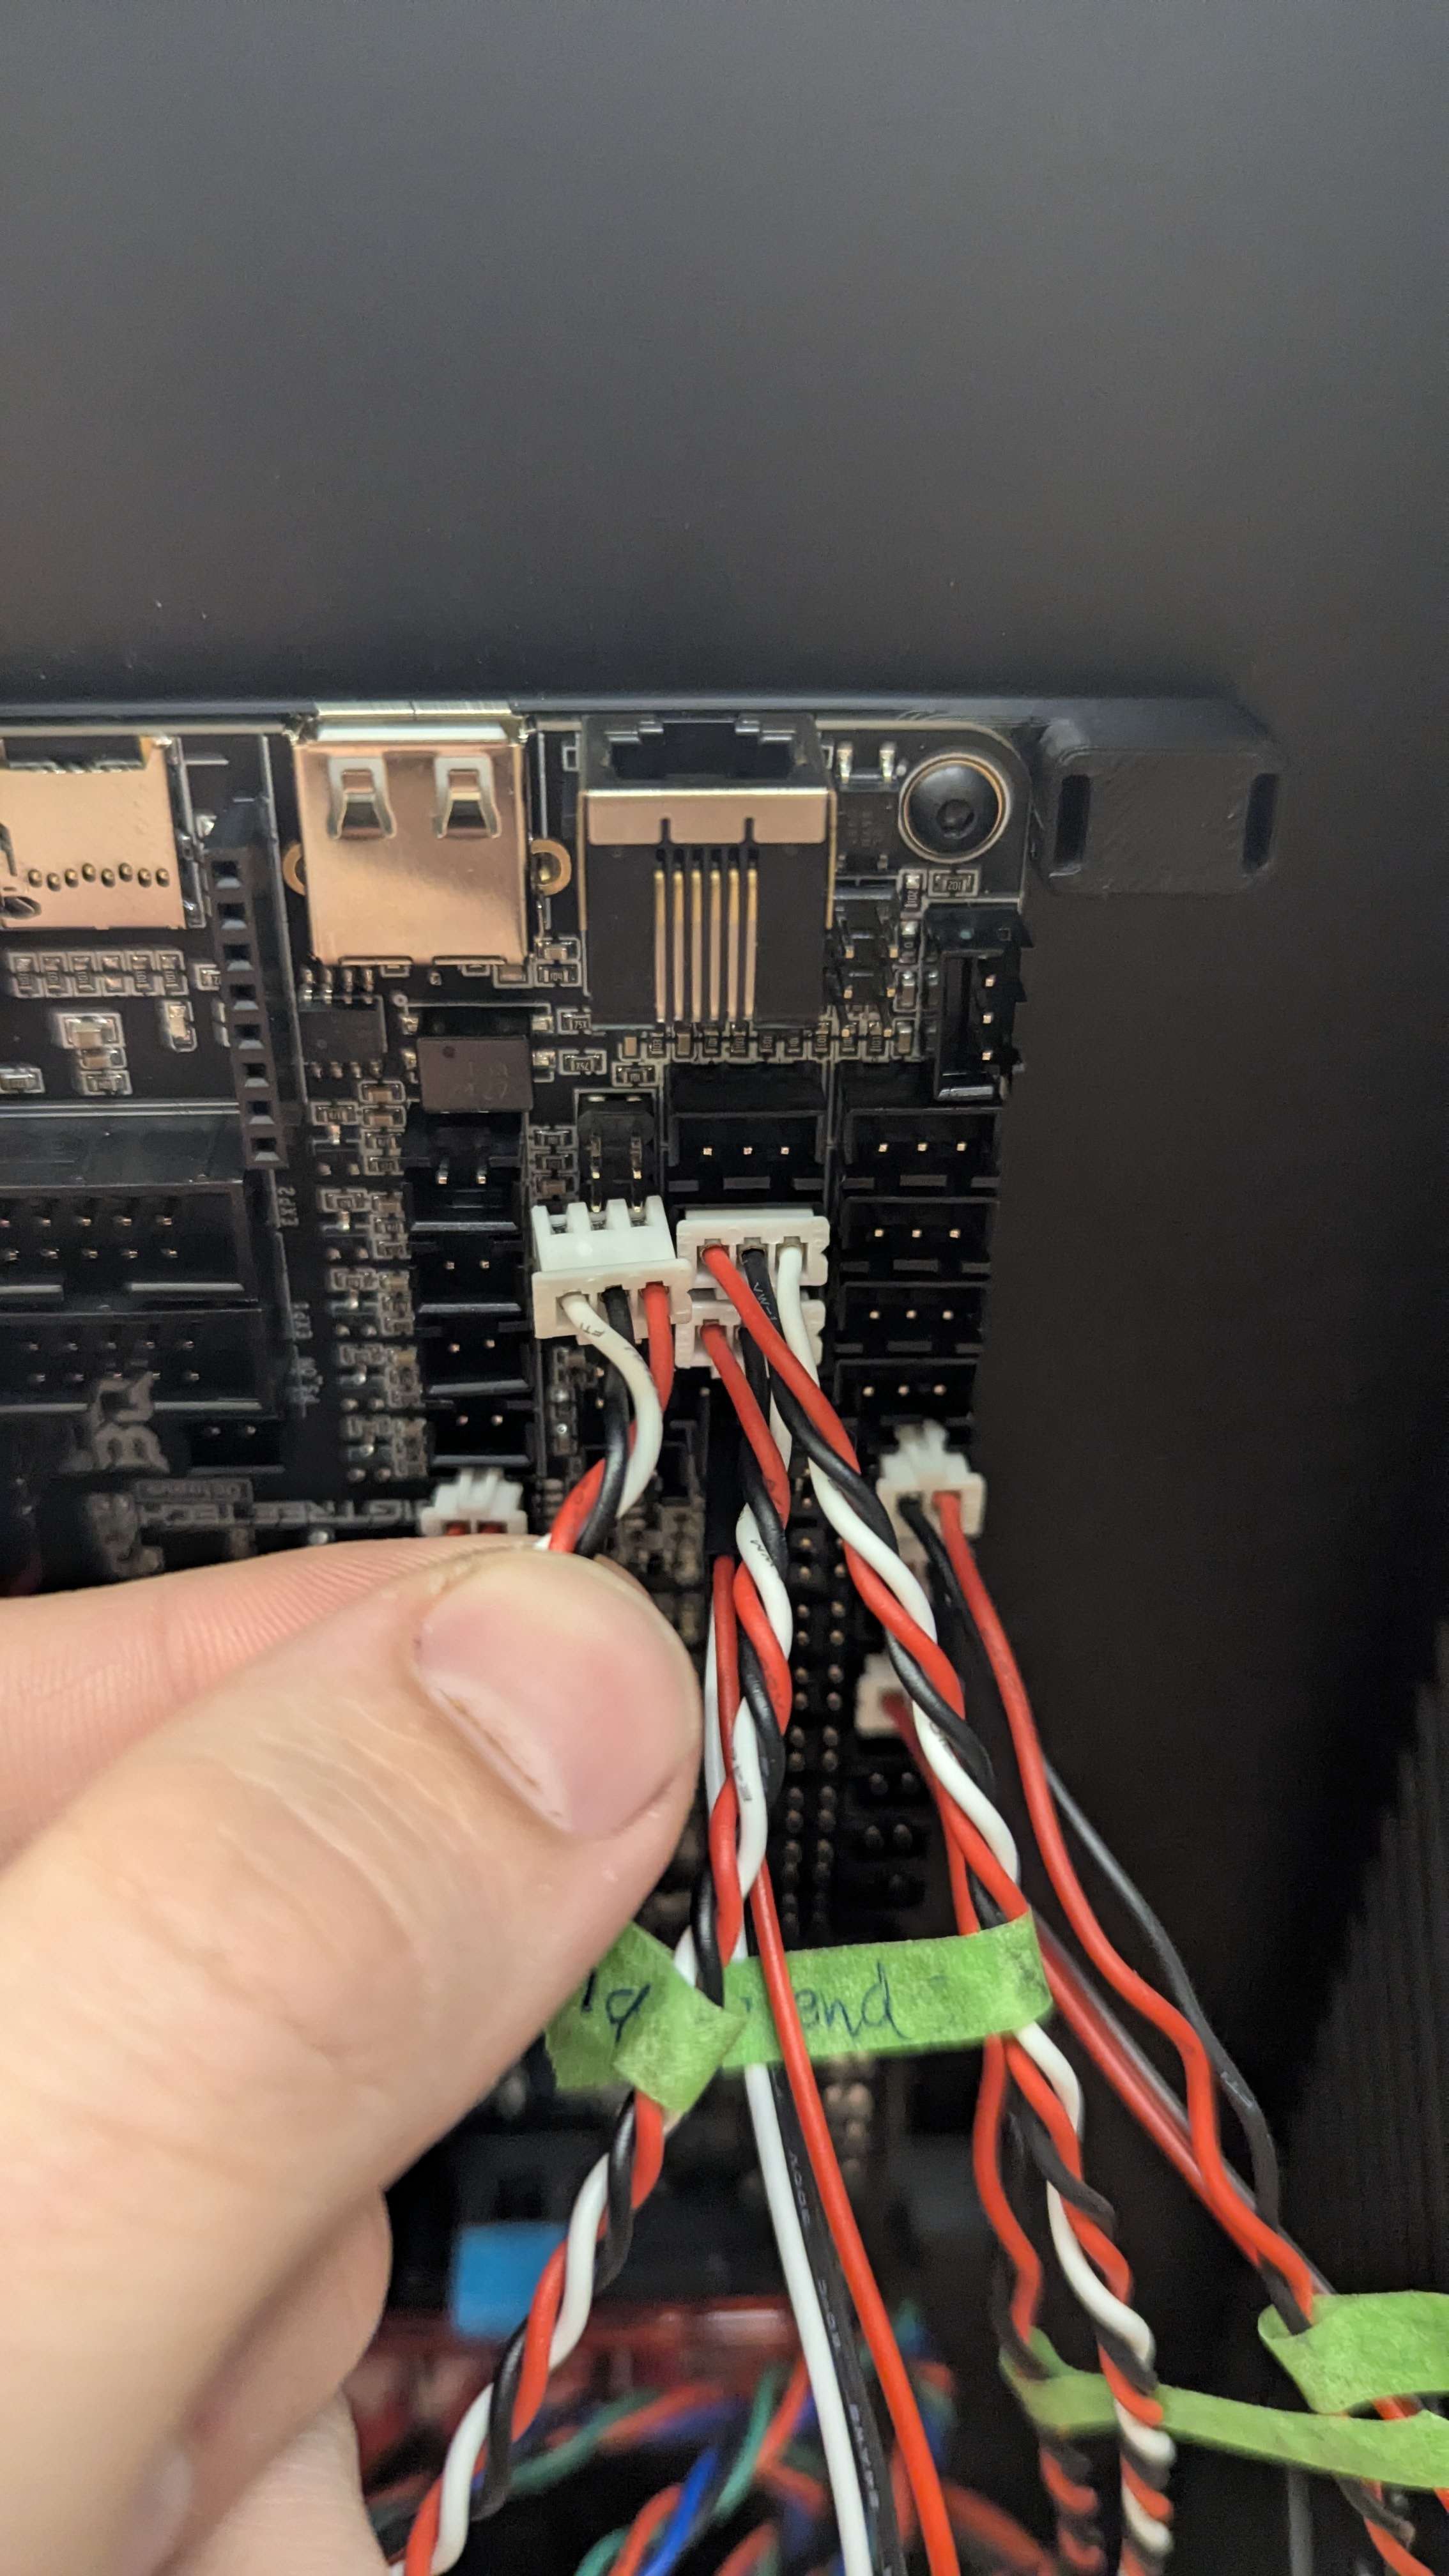
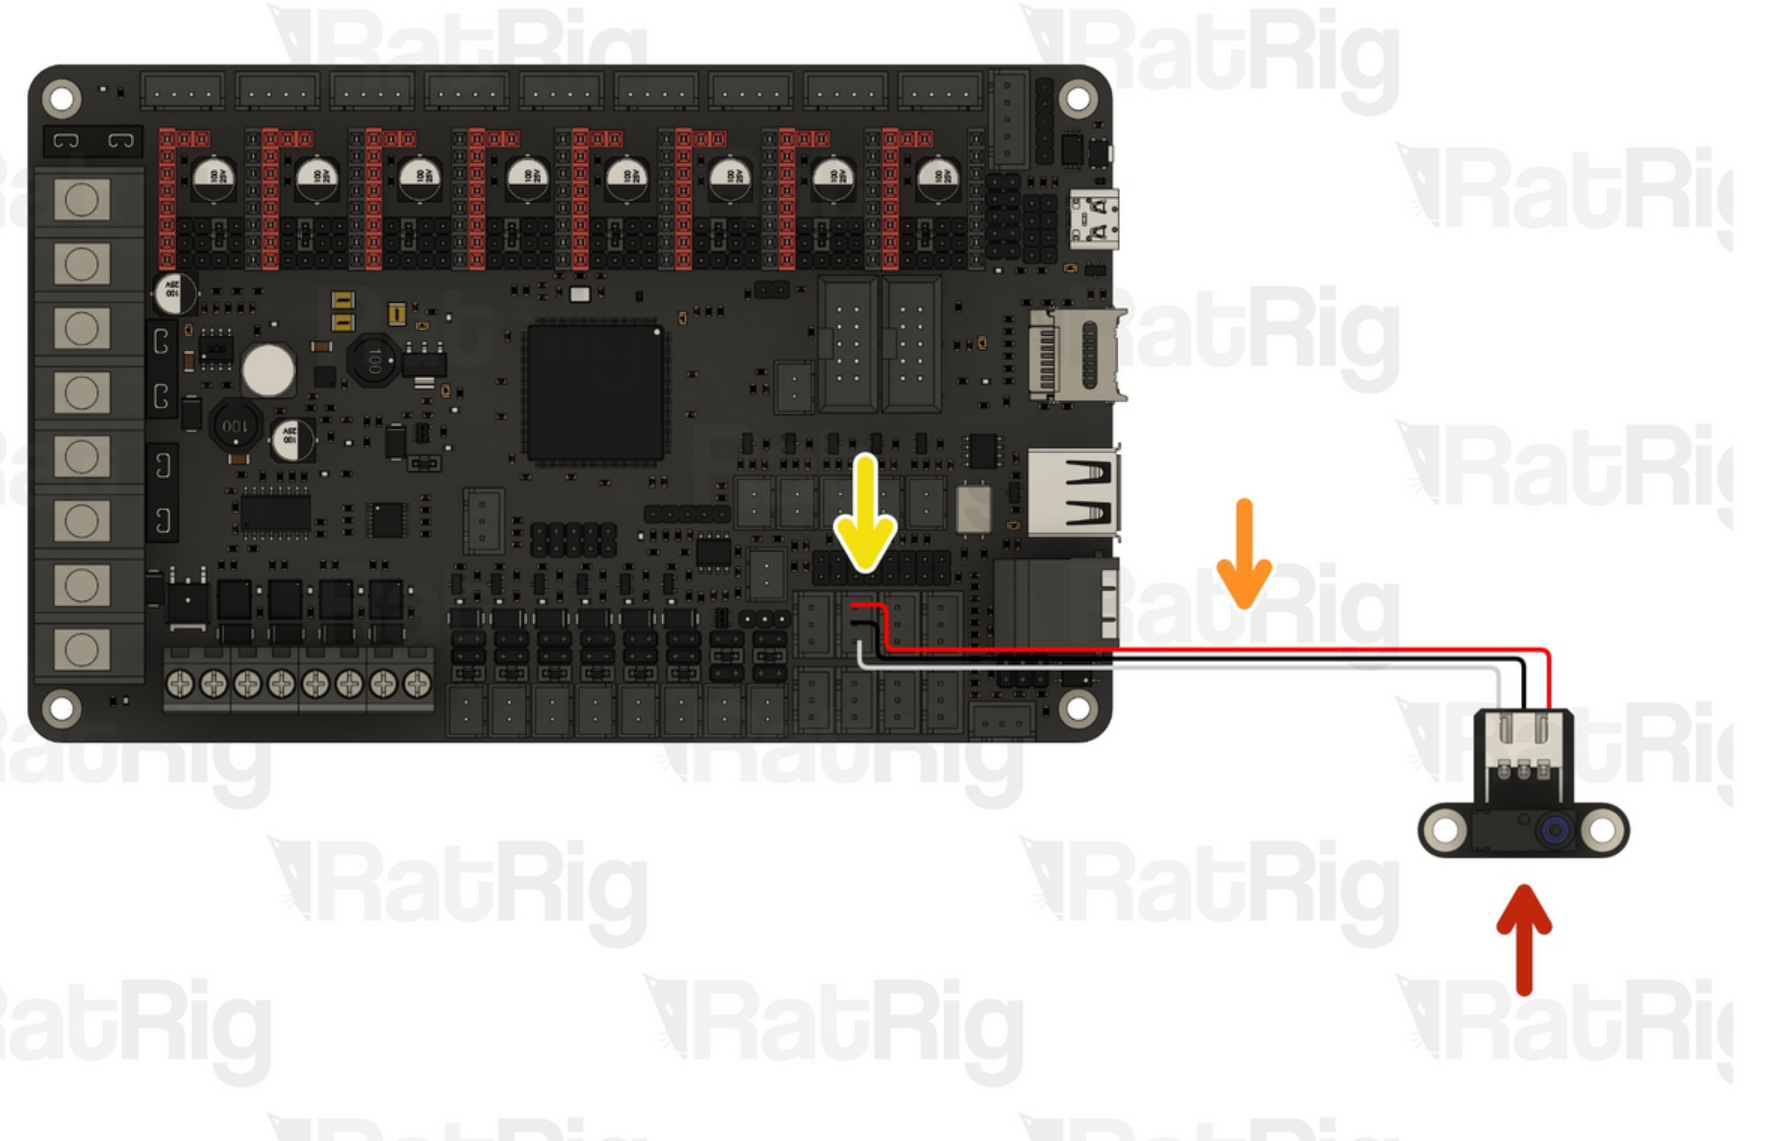
Do you have a pic of your board? with some indication of where you've been plugging in your Y endstop?
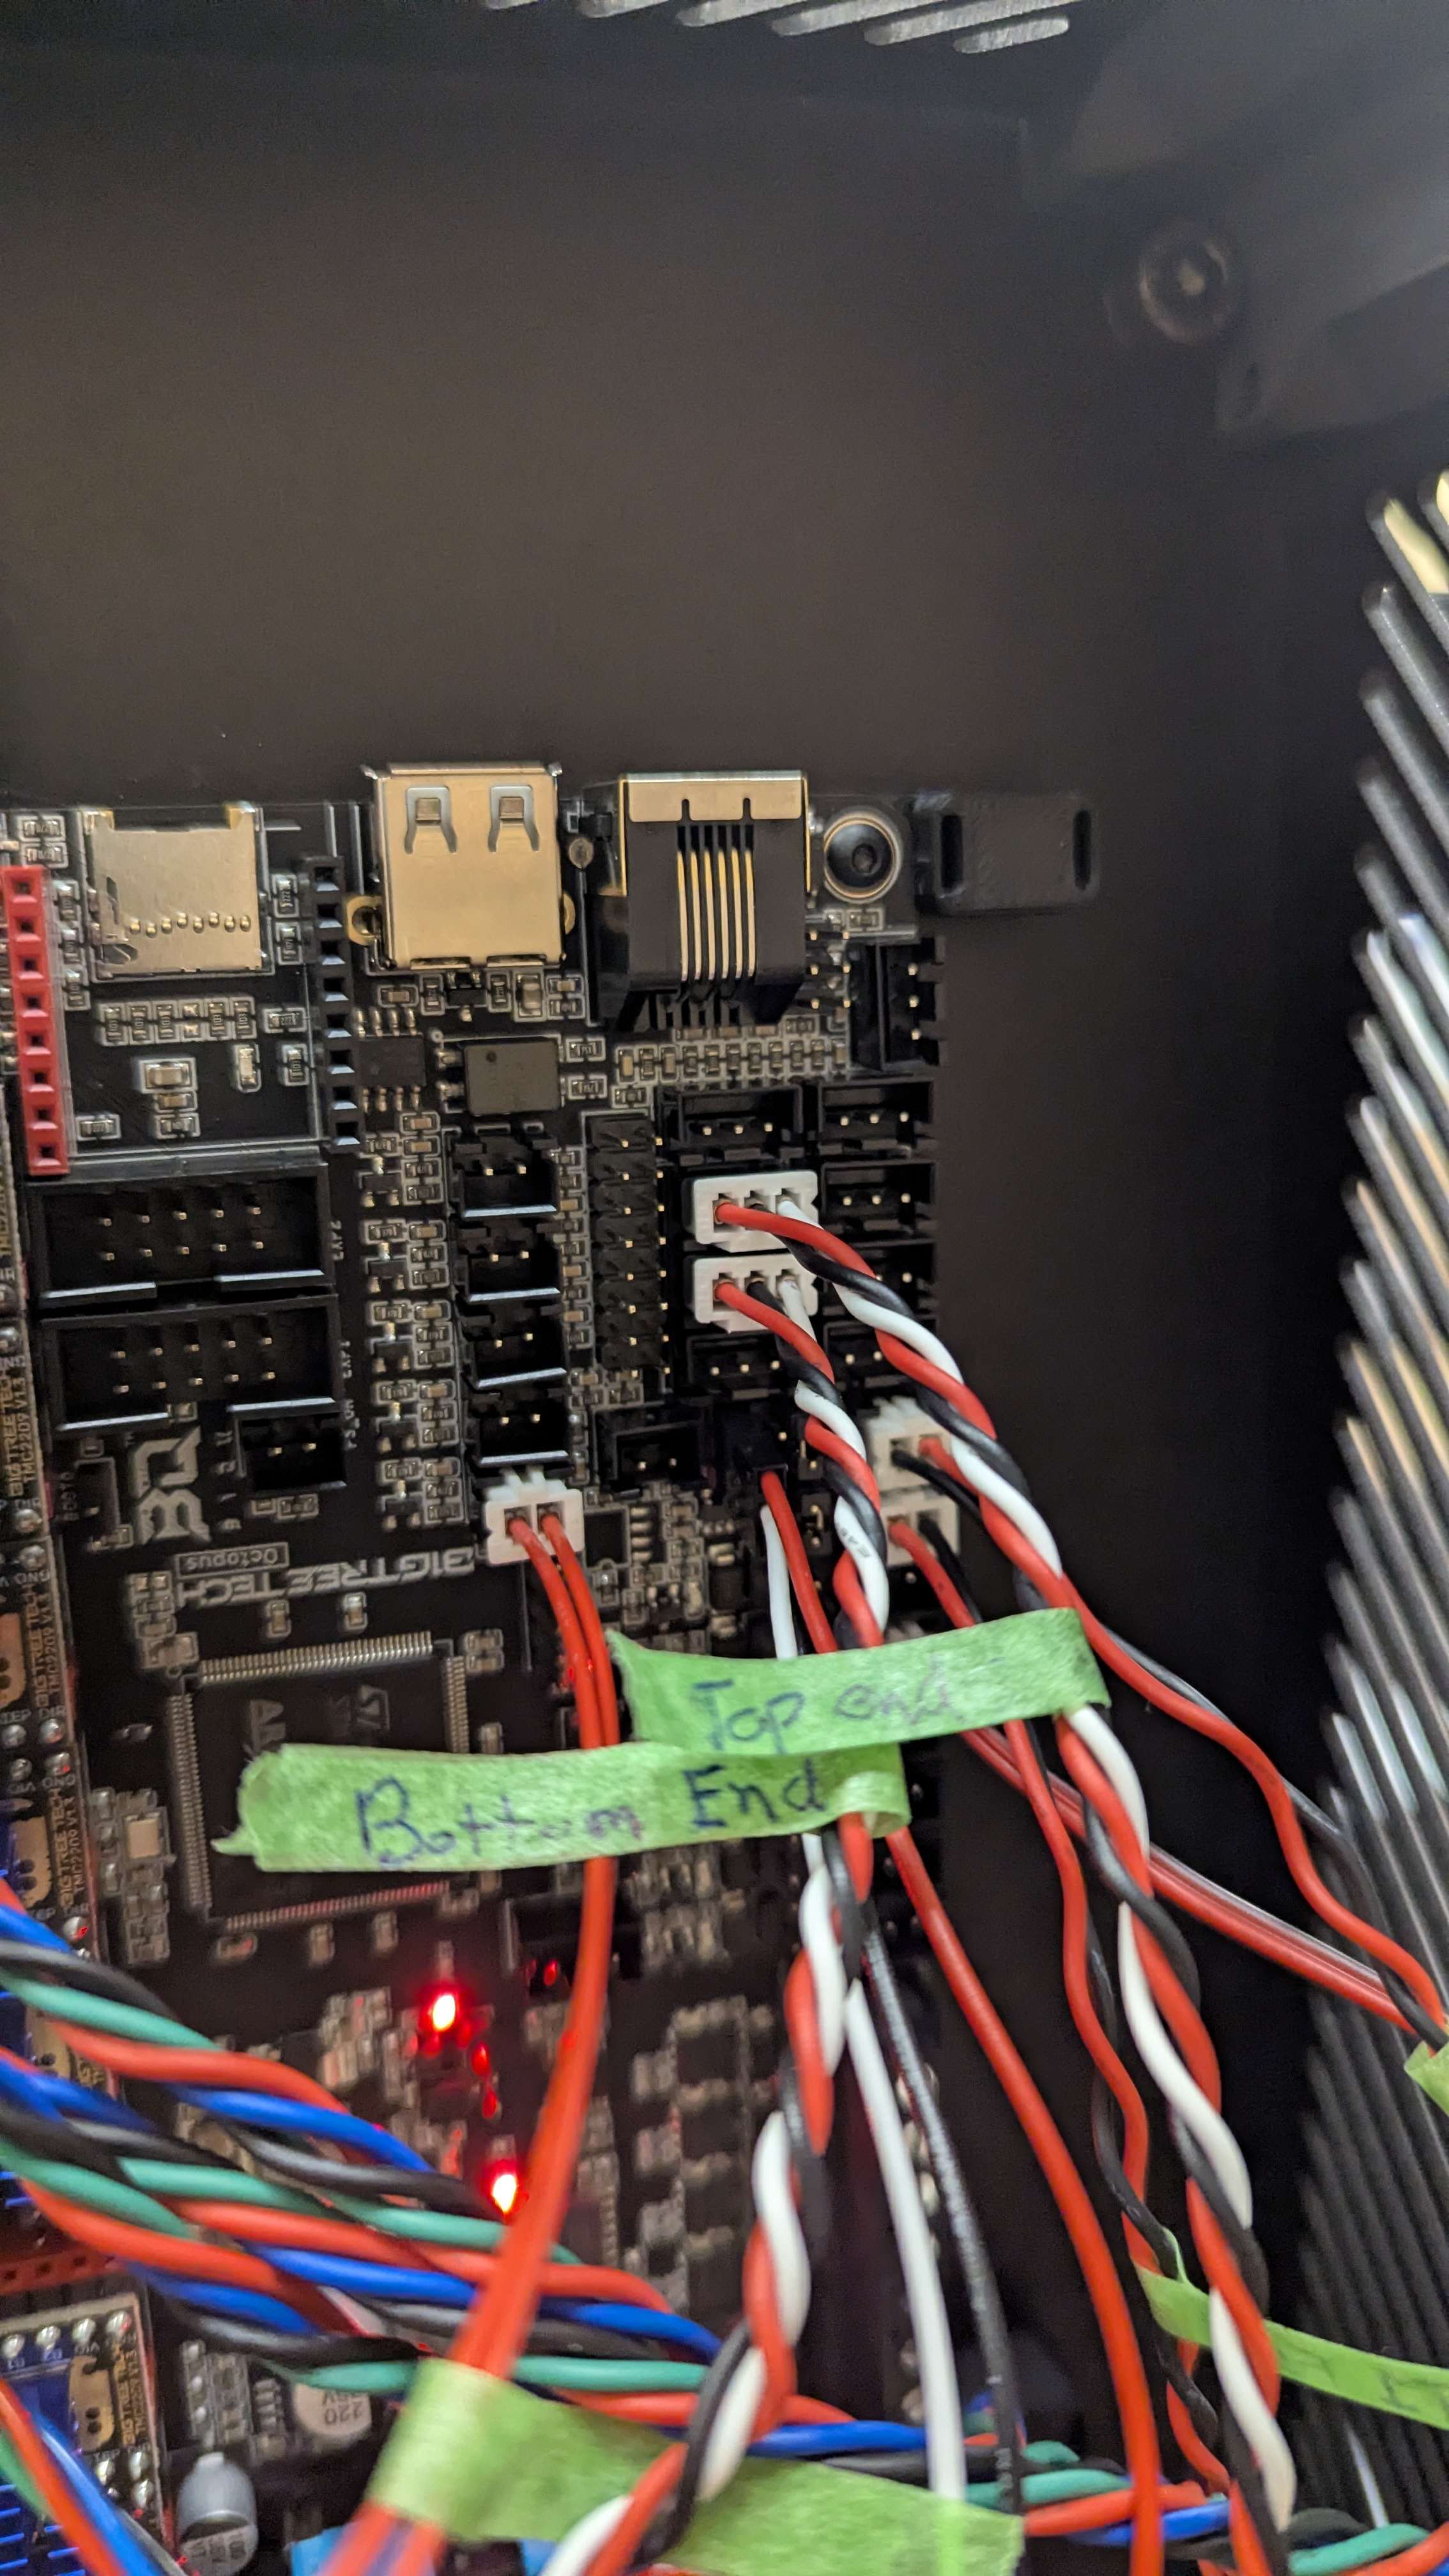
Bottom one is for the y end stop
oh
I see
:)
you need to shift both endstops down a port
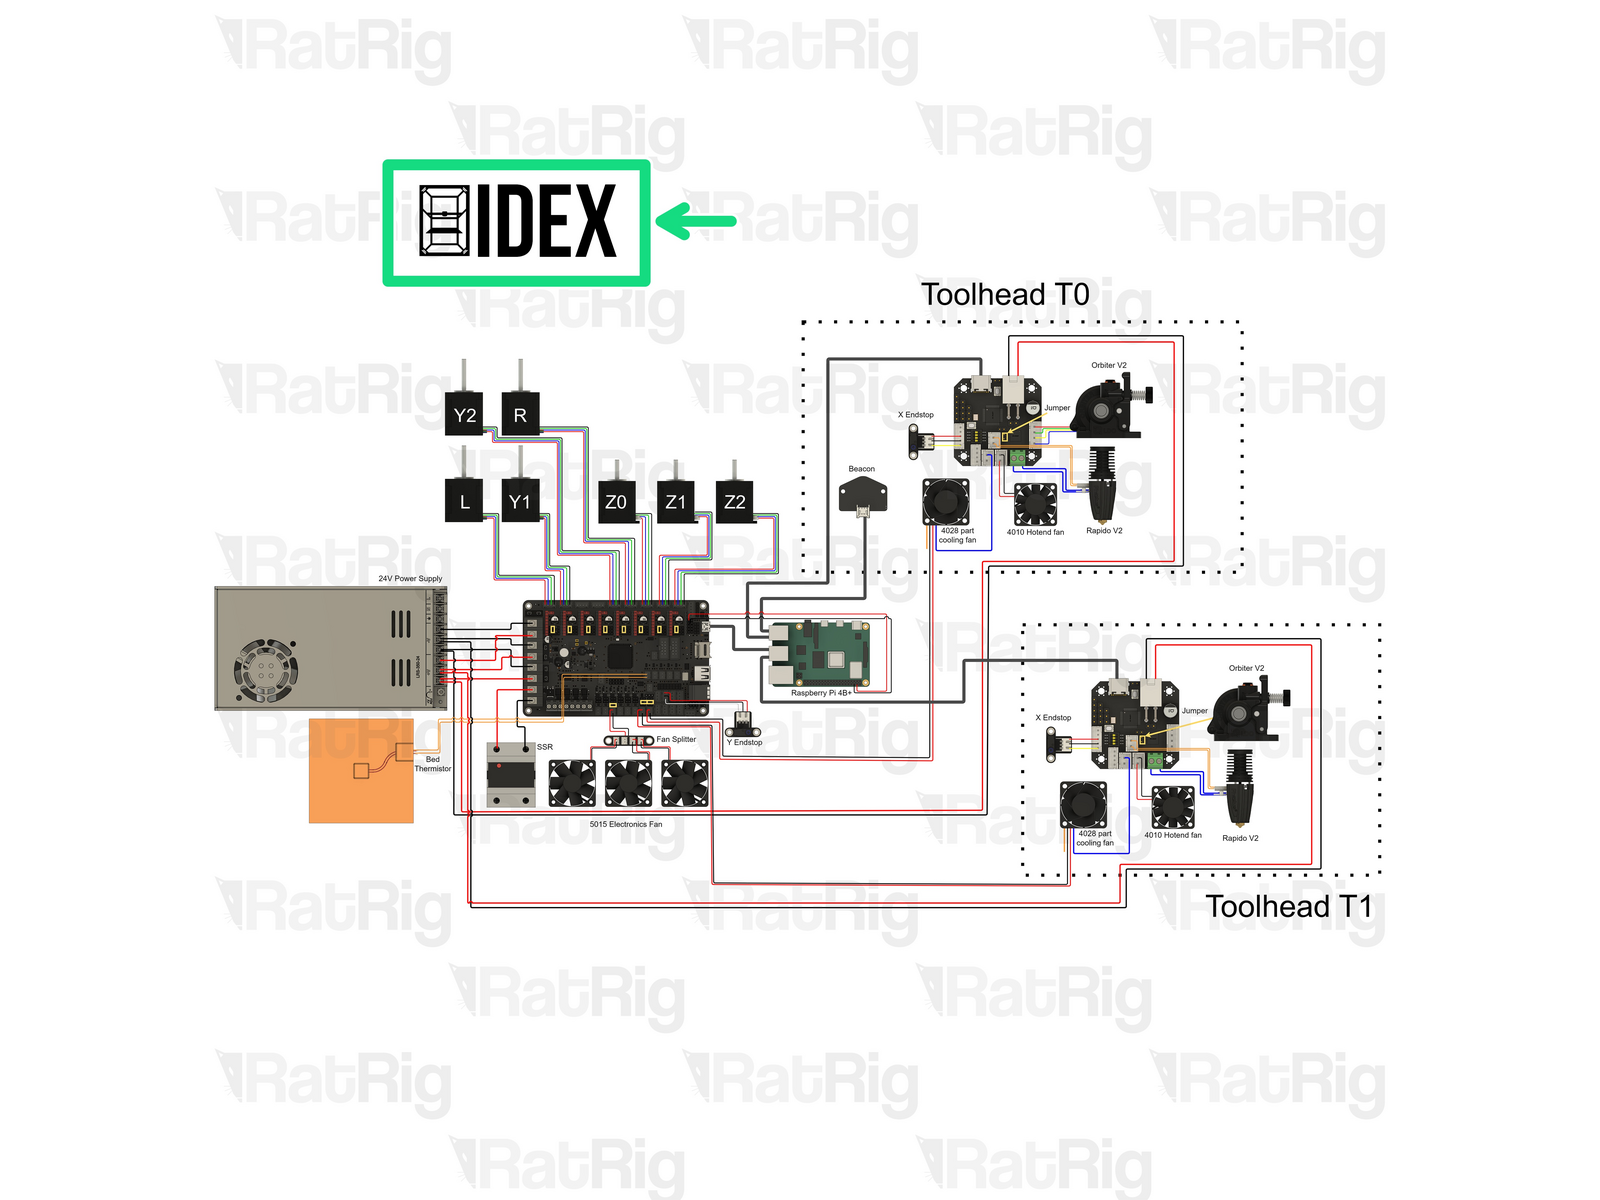
let me double check vcore 4 wiring diagram first
Seems to be close another one has the other wire I have for the z end
I do believe I misspoke and the bottom one is y and top is z
from the guide, light blue is Z
from your pic, and your wire labelling, you have them reverse, i think

Yes that is the way I have it hooked up
so "top end" is Z and "bottom end" is Y?
I just label them top and bottom when I was unplugging it wasn't related to the z being bottom and y being top
Yes top is z end and bottom is y end
could you just double check, pressing the Z endstop and seeing if that changes the state of the Y?
They didn't change. Both z and y say triggered no matter if they are clicked or not. I assume something happened in the config not necessarily physical since the cable is fine for the other sensors and they work
I'd agree. May be worth trying to go through the reflashing/reconfig process and seeing if that fixes it
I did lol forgot to mention that in the main chunk I did that 3 times
Both Z and Y not working is odd
Yeah that's what I'm saying lol I can't find anyone with this issue and it's probably something super dumb I did lol
in the current configuration, X and dual carriage both update when you push them?
Yes those are working perfectly. Even plugged my end stop from y into the plug for x and it updated when pushed to triggered and open when open
Also this is a brand new octopus board because it seemed like a board pin issue hahaha
My config files are there with the original posted message if you had time to look at those and let me know if you see anything crazy. They are base and I have changed nothing on them. I can also send a pic of the config window and stuff tomorrow if that would help
looking through the instructions now. This just feels like something small is missing
doubt it's config, if it's a config issue with a fresh install others would have this issue
Hahaha agreed! Thanks for the assistance I really appreciate it
I worried I needed to change the config to something for the end stops but the only option is for the laser end stop or whatever and I definitely don't have that
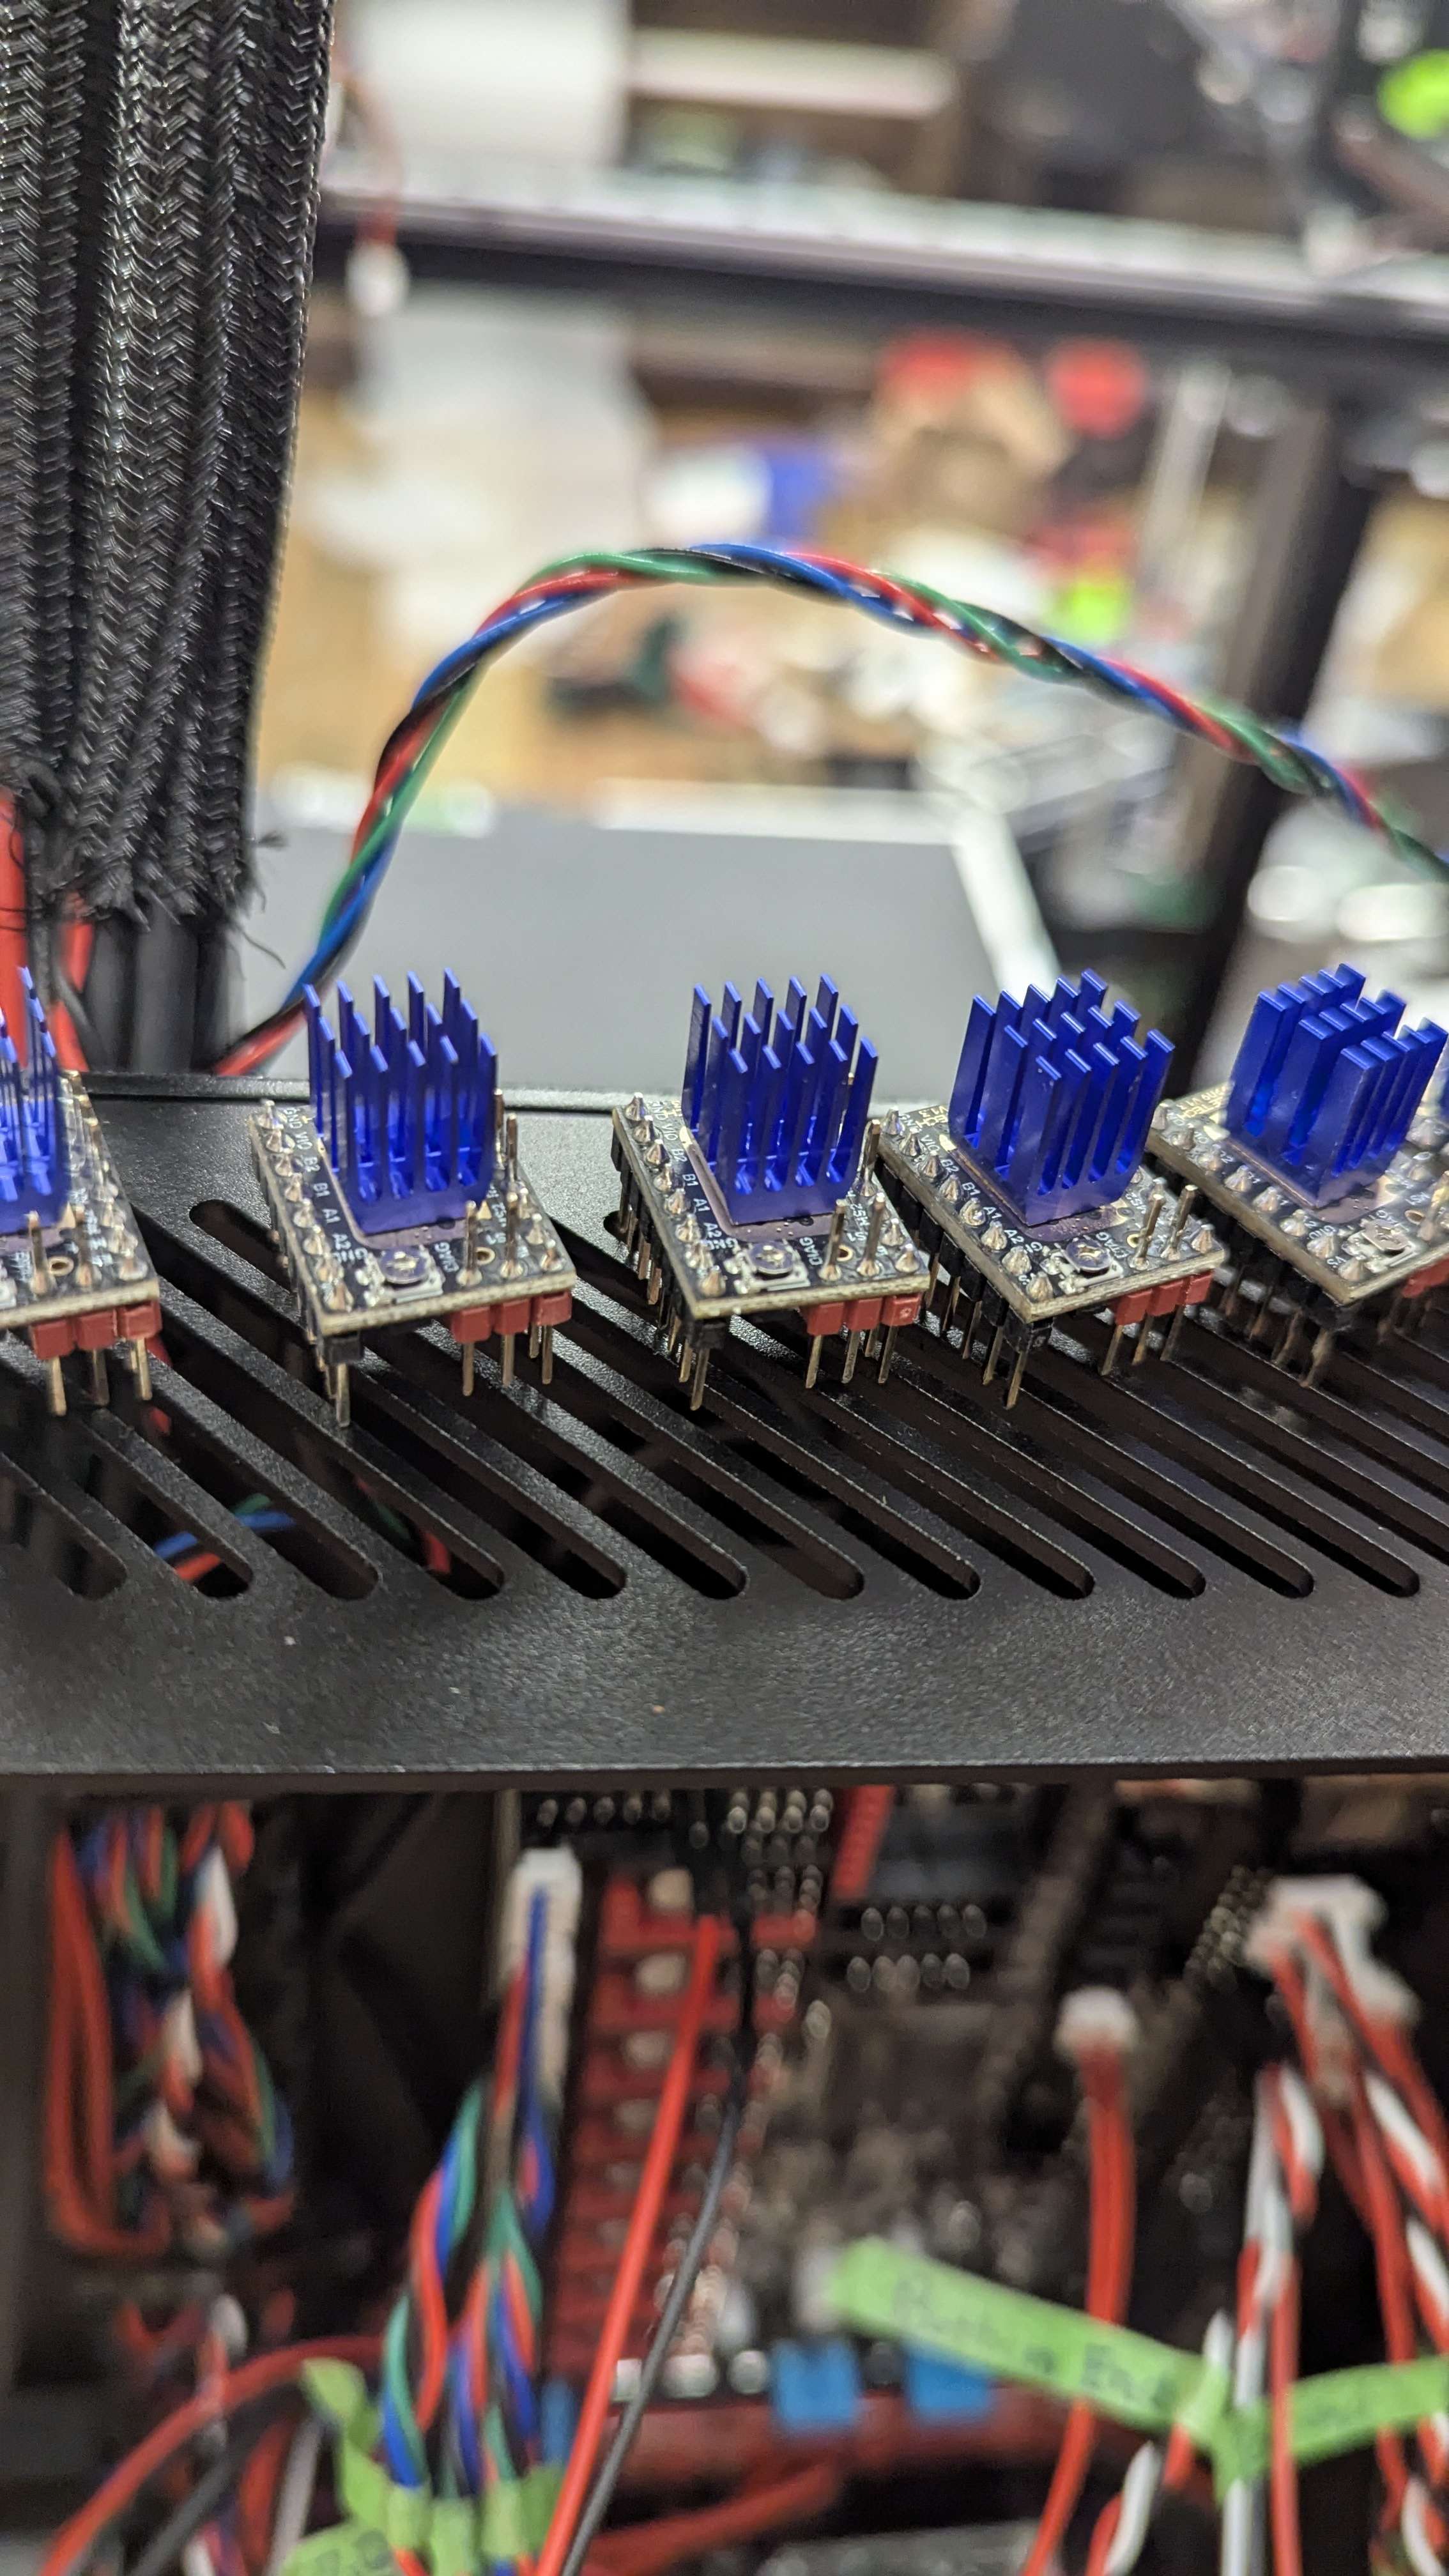
double check your jumpers for the stepper drivers, if the incorrect ones are in place the endstops will not function
(due to the sensorless homing option that the drivers have)
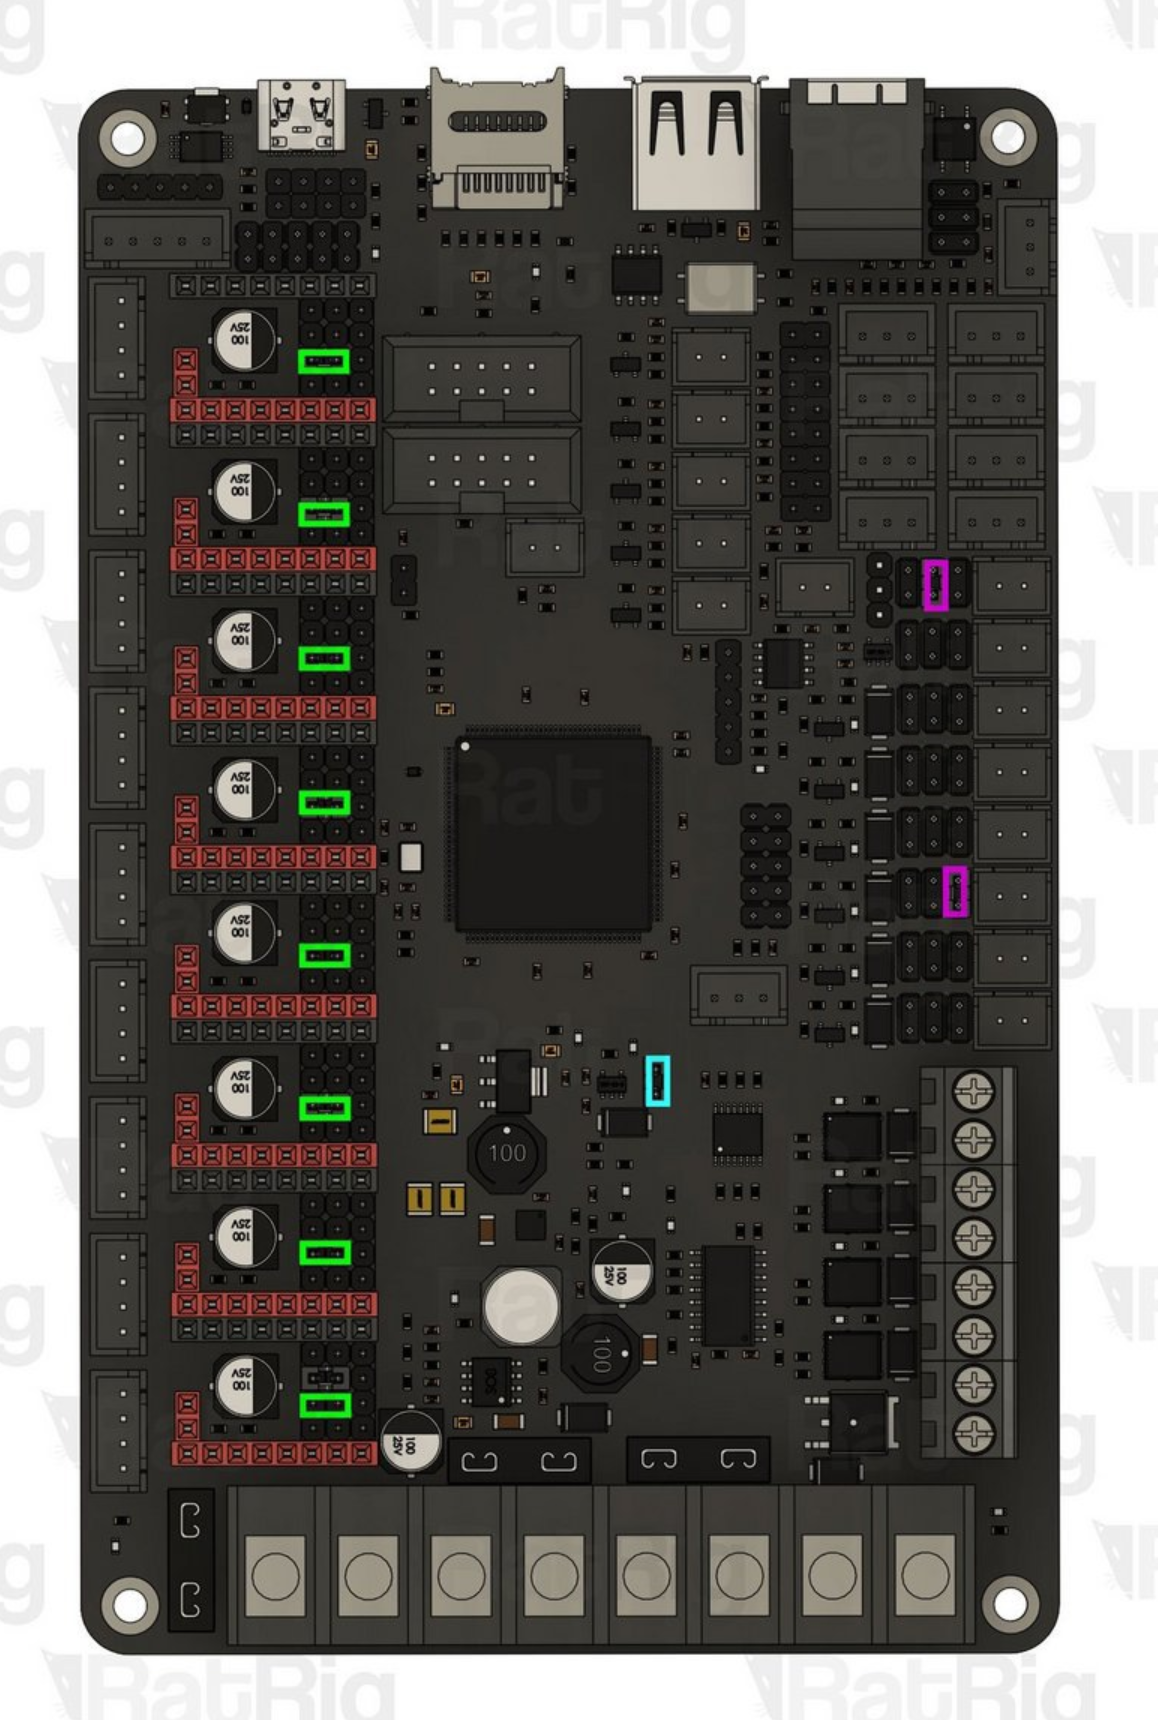
Everything but the blue one is correct the blue one says to remove it right?
not that I doubt you but also there's no way you took off all your stepper drivers and checked in 2 min :kekw:
but yes
I didn't hahaha I just rebuilt this thing already earlier today and double checked that before doing the post but I shall check again I'm desperate at this point hahah 🤣
All good, we'll figure it out. it's gonna be something small I can feel it in my bones
I have to be up in like 5 hours so I may have to revisit this tomorrow
Popped them off real quick. They look right
looks right to me
And the only other jumpers are here per fans I have on
Also now that we are talking about it one of my fans is just on 100% if the time when I have power on....
Could one of these be bad causing this too?
this is typical for these fans, when they don't receive proper signal they default to 100% (if you're talking the large part cooling fans).
This just means you have a bad crimp/connection on the signal pin
I don't think so...
may be silly
Oh okay cool!
What may be silly the things I sent being bad?
no I had an idea but it's still not great lol
Hahaha what's that?
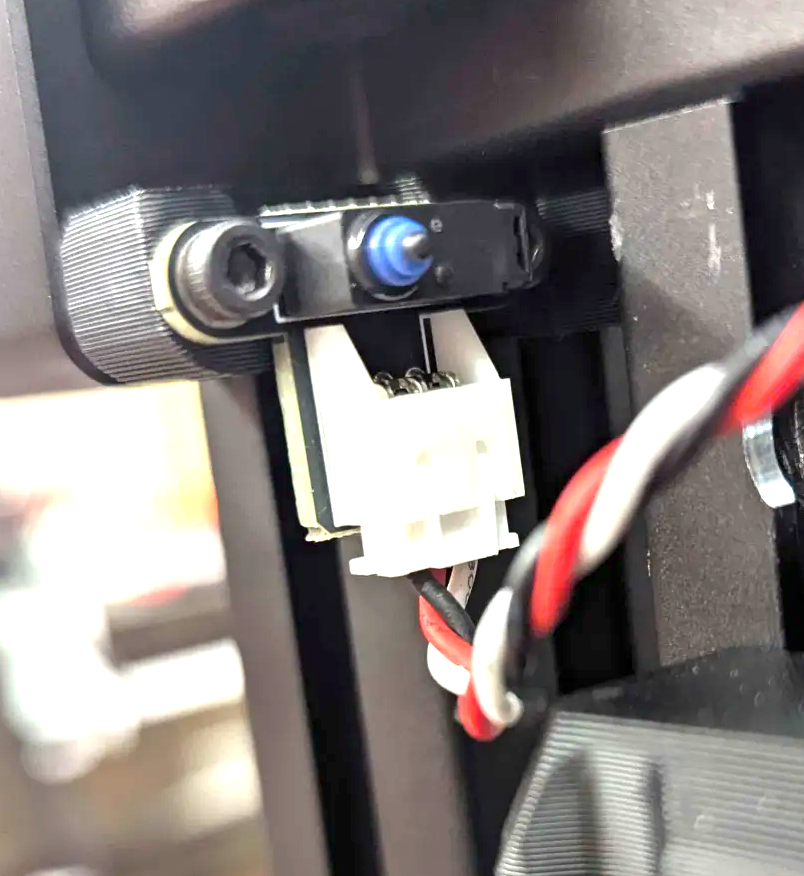
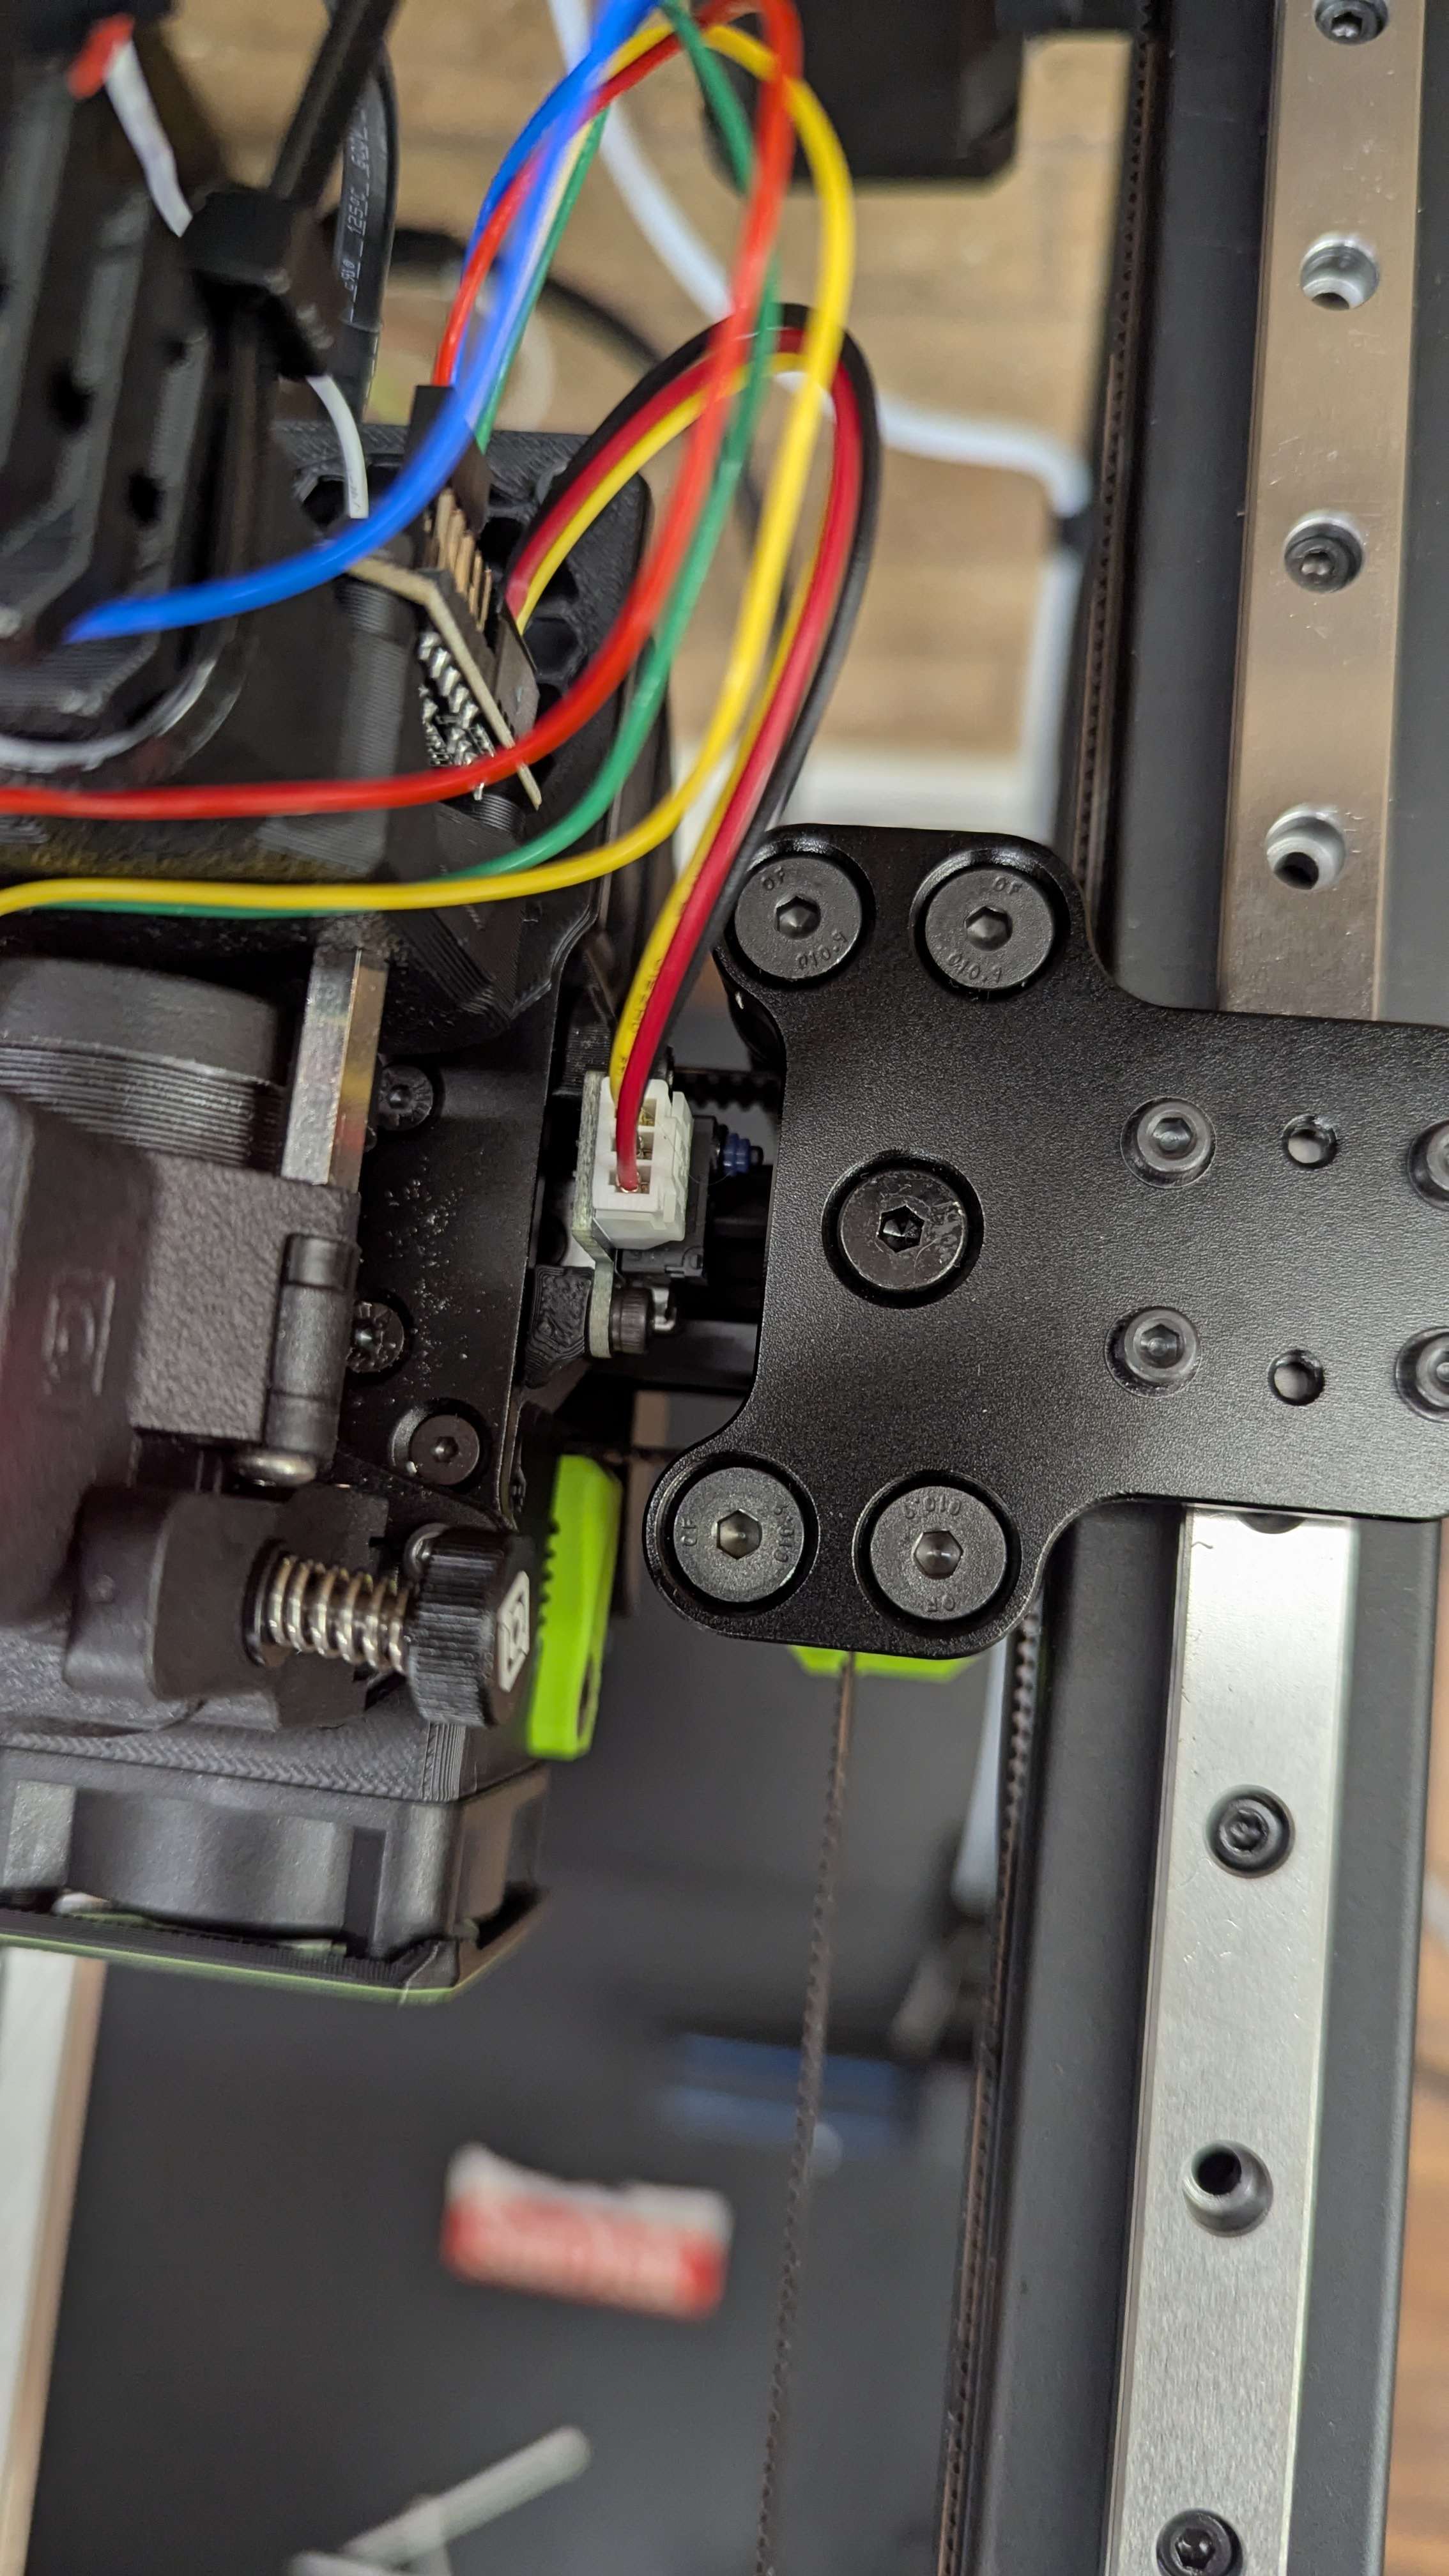
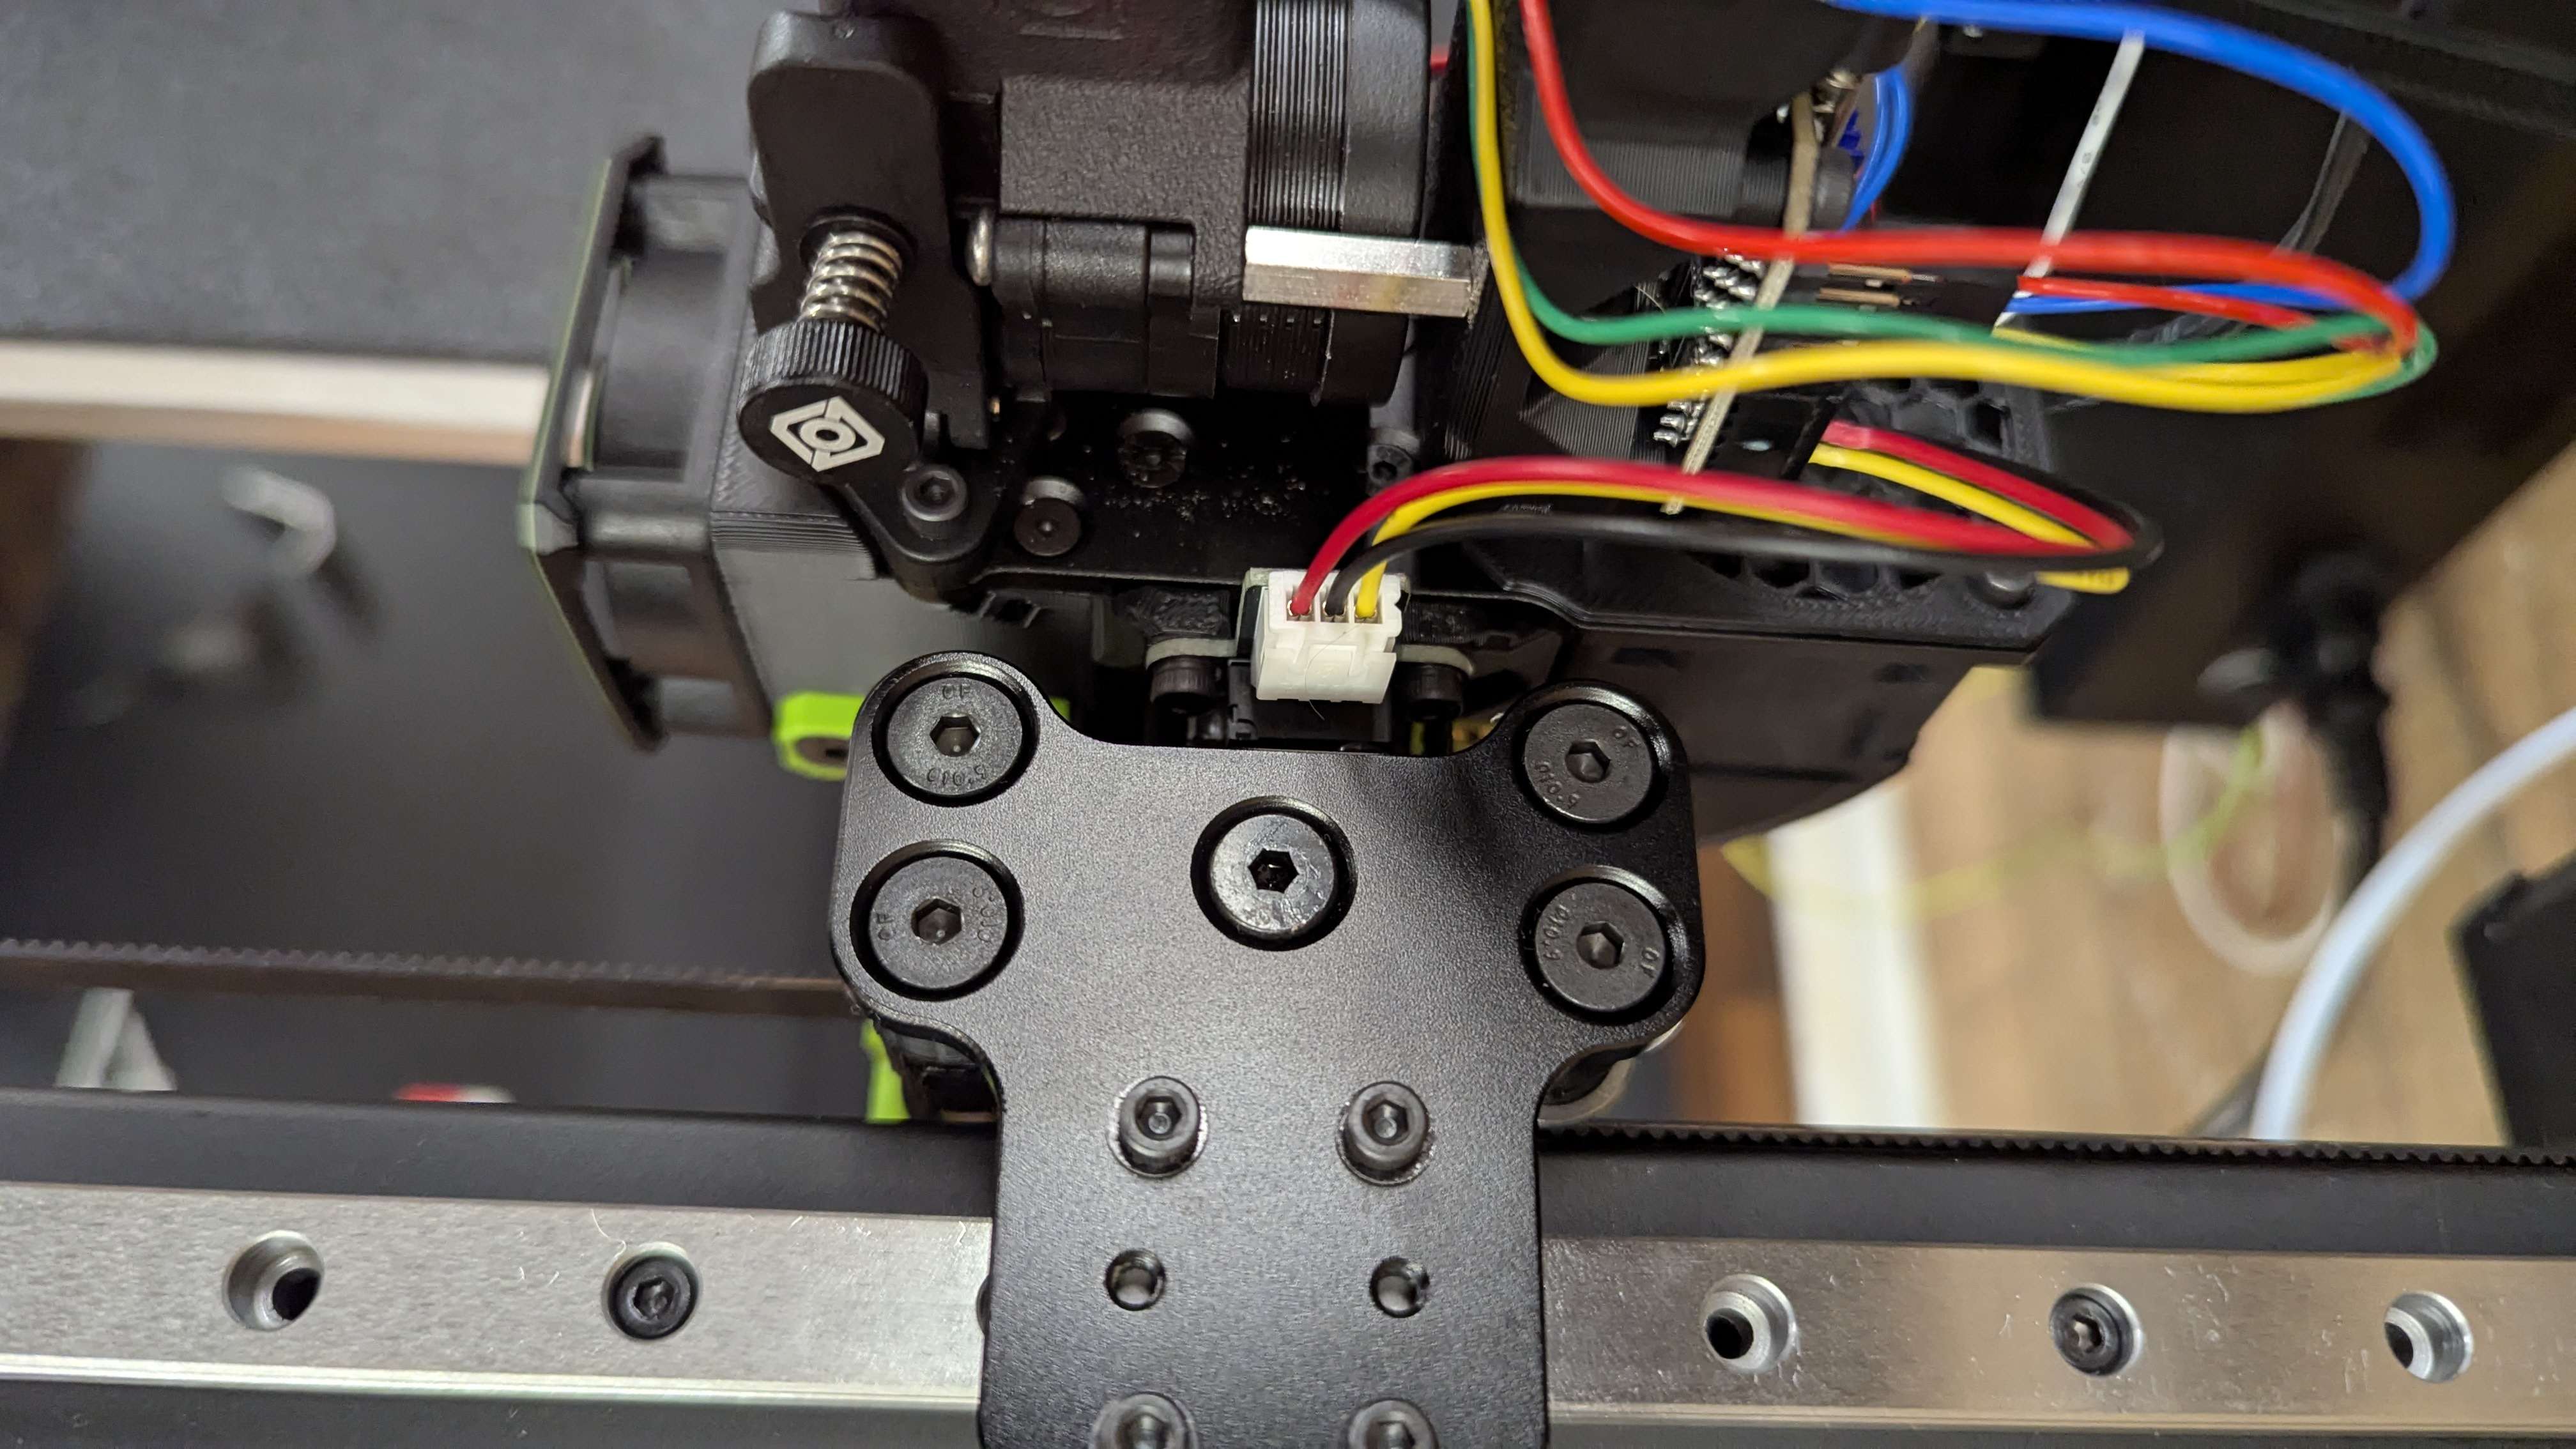
can you send pic of your y end stop? or how they are wired on the endstop side?
Sure
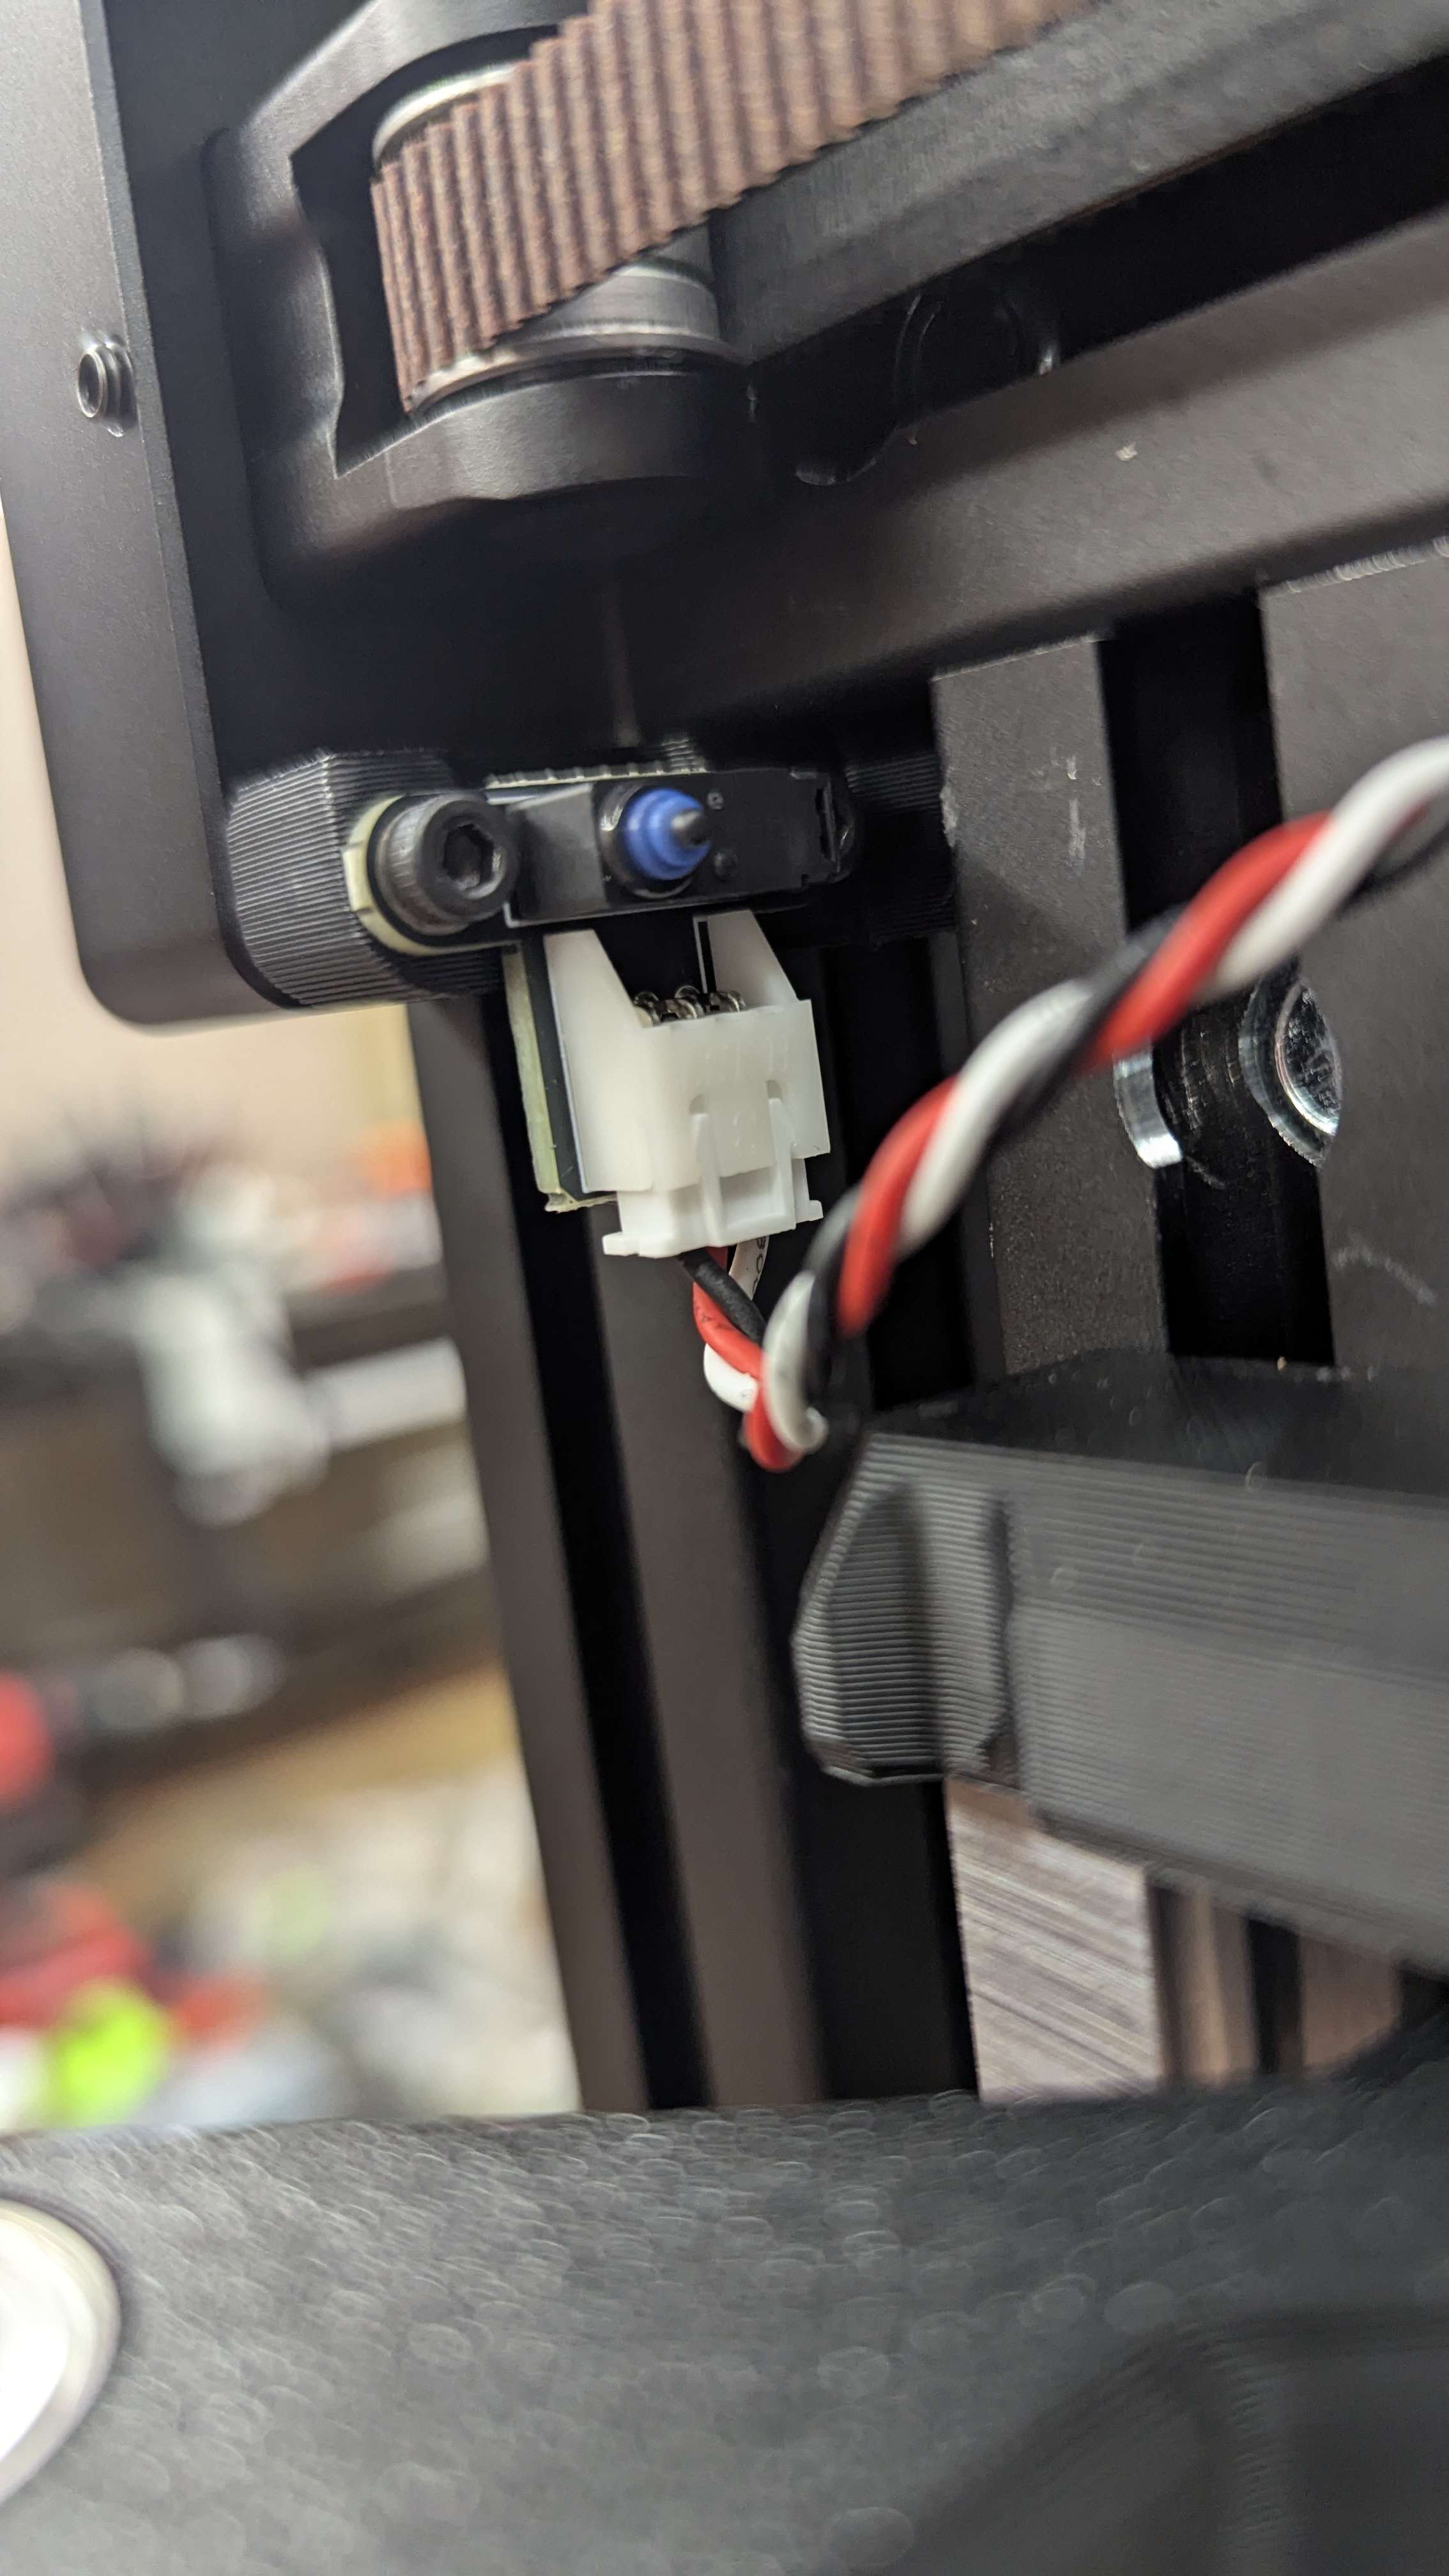
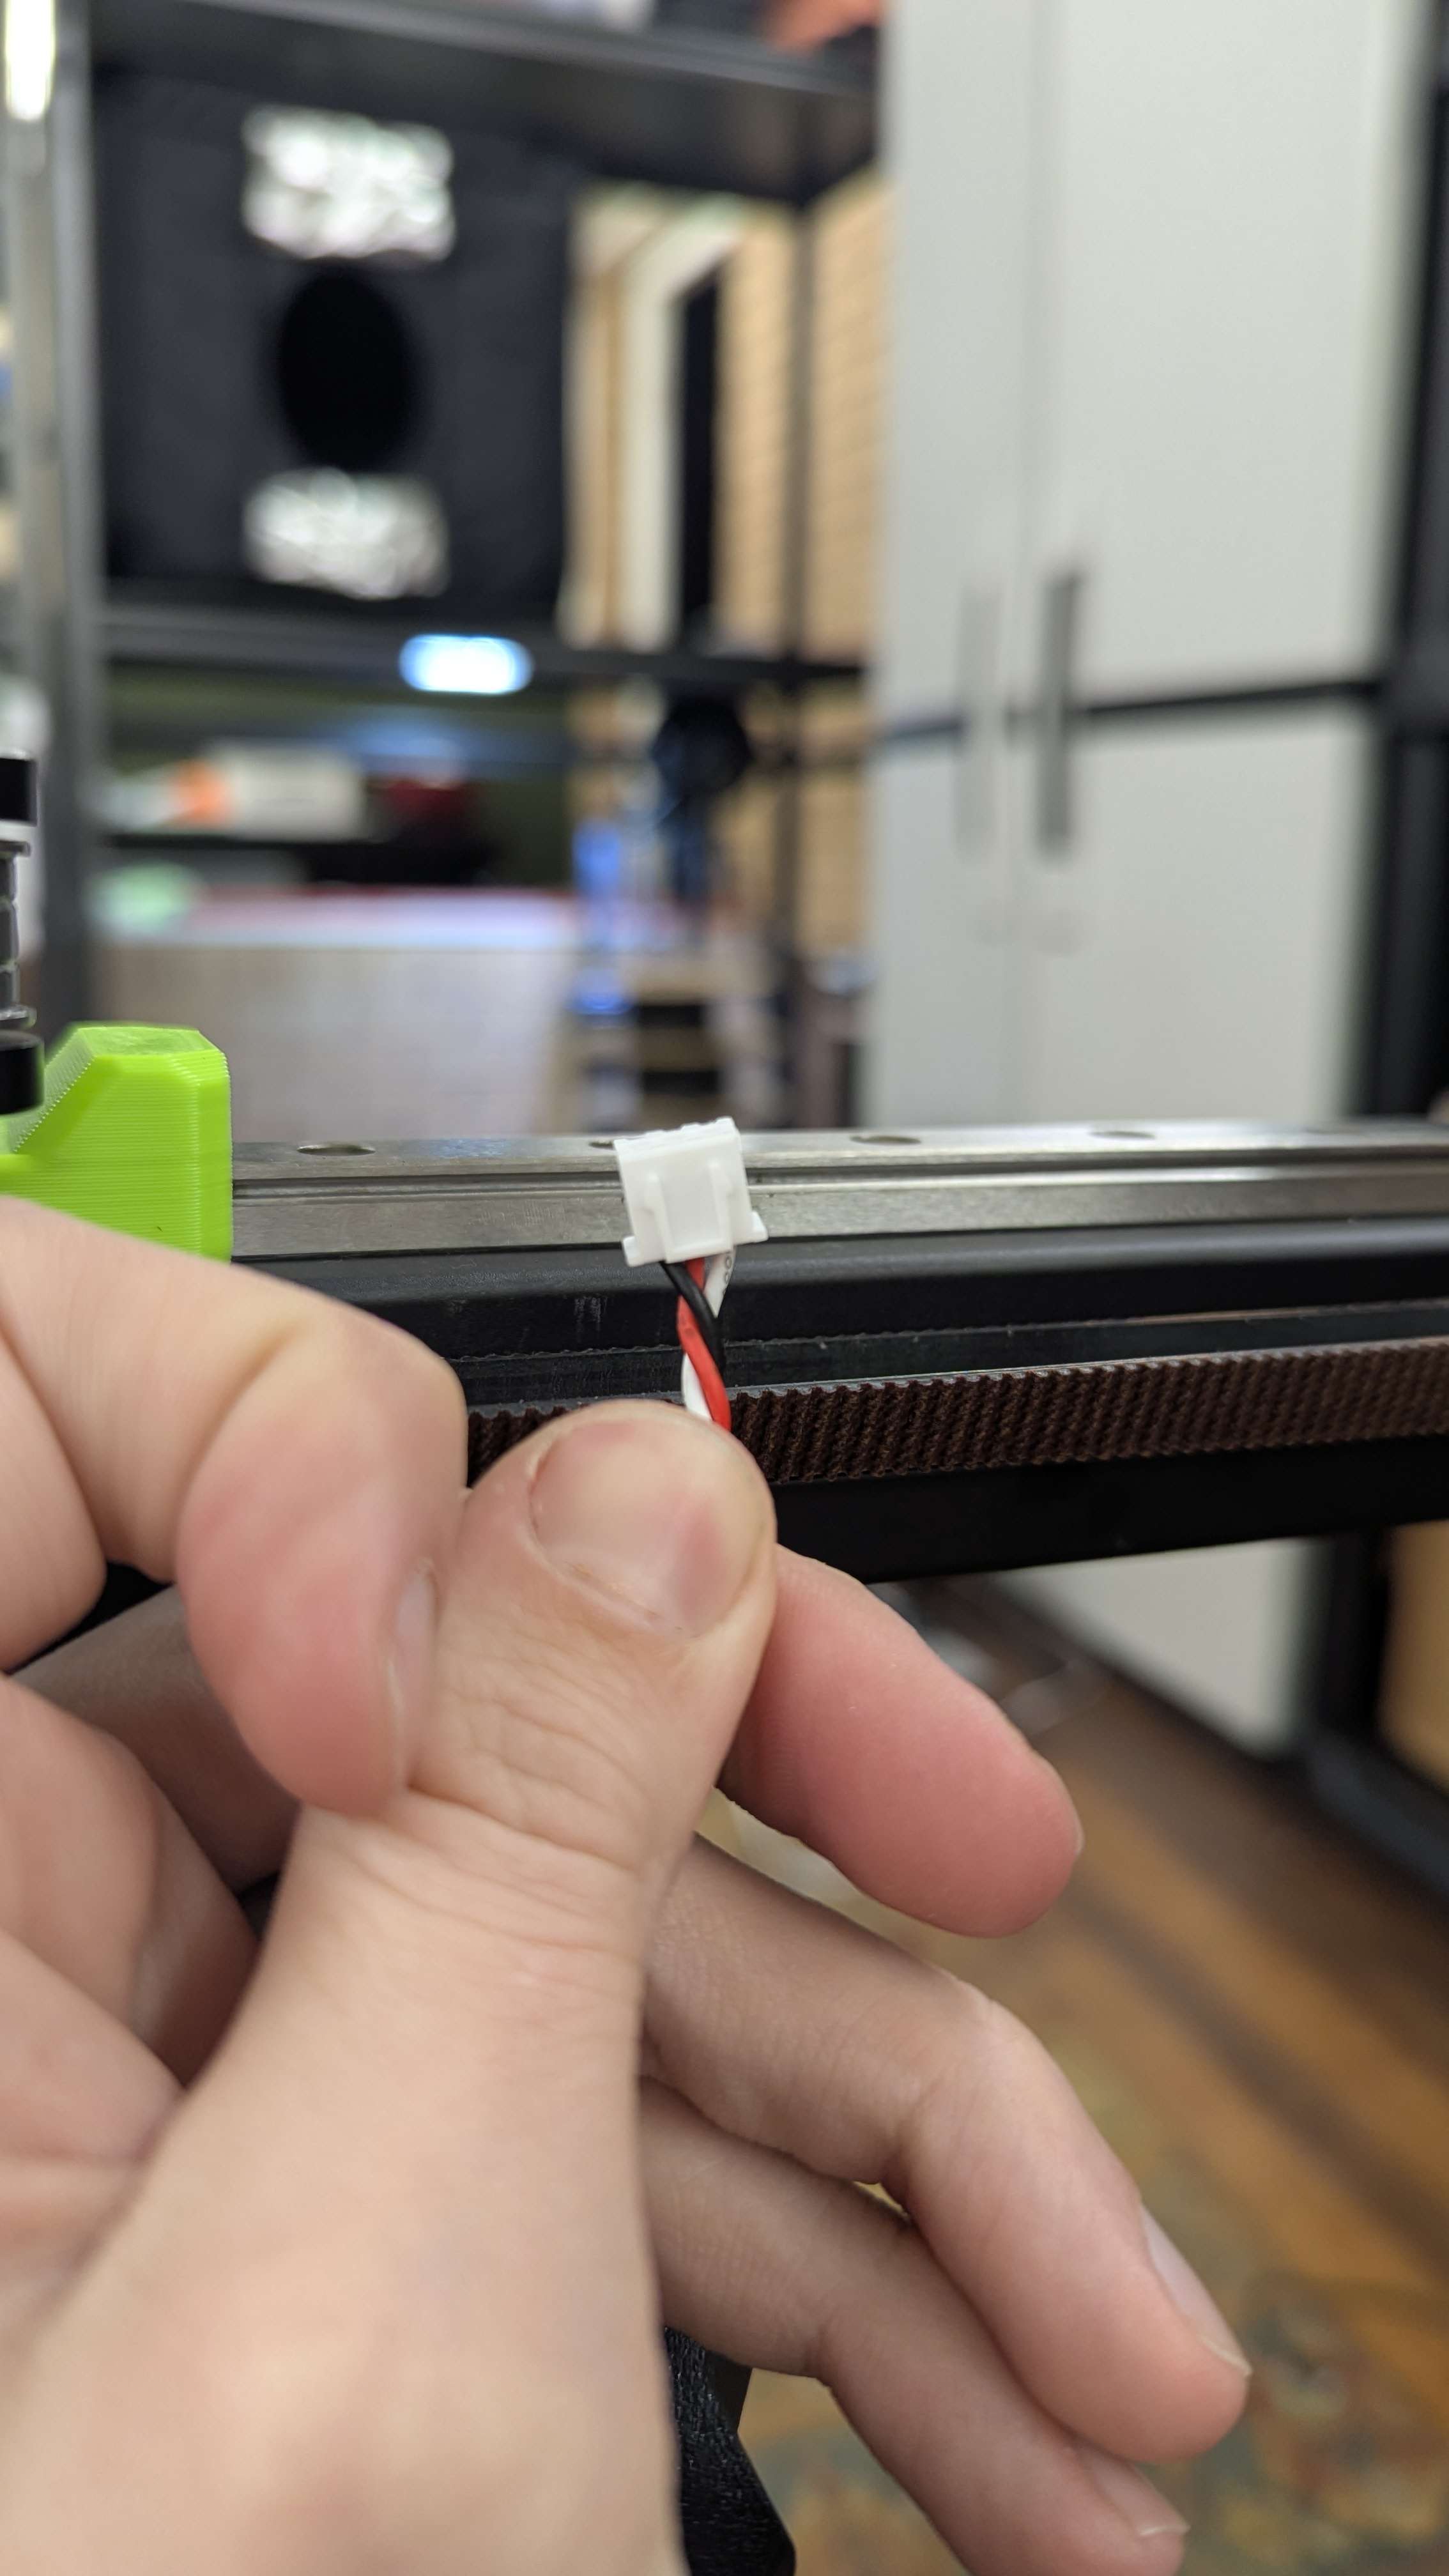
bingo
Bingo!?!
Was I supposed to do something with it that I missed hahaha this is the stock cable 🤣

Looks like they cross wired it
Swap the black and red it looks like
What the hell!
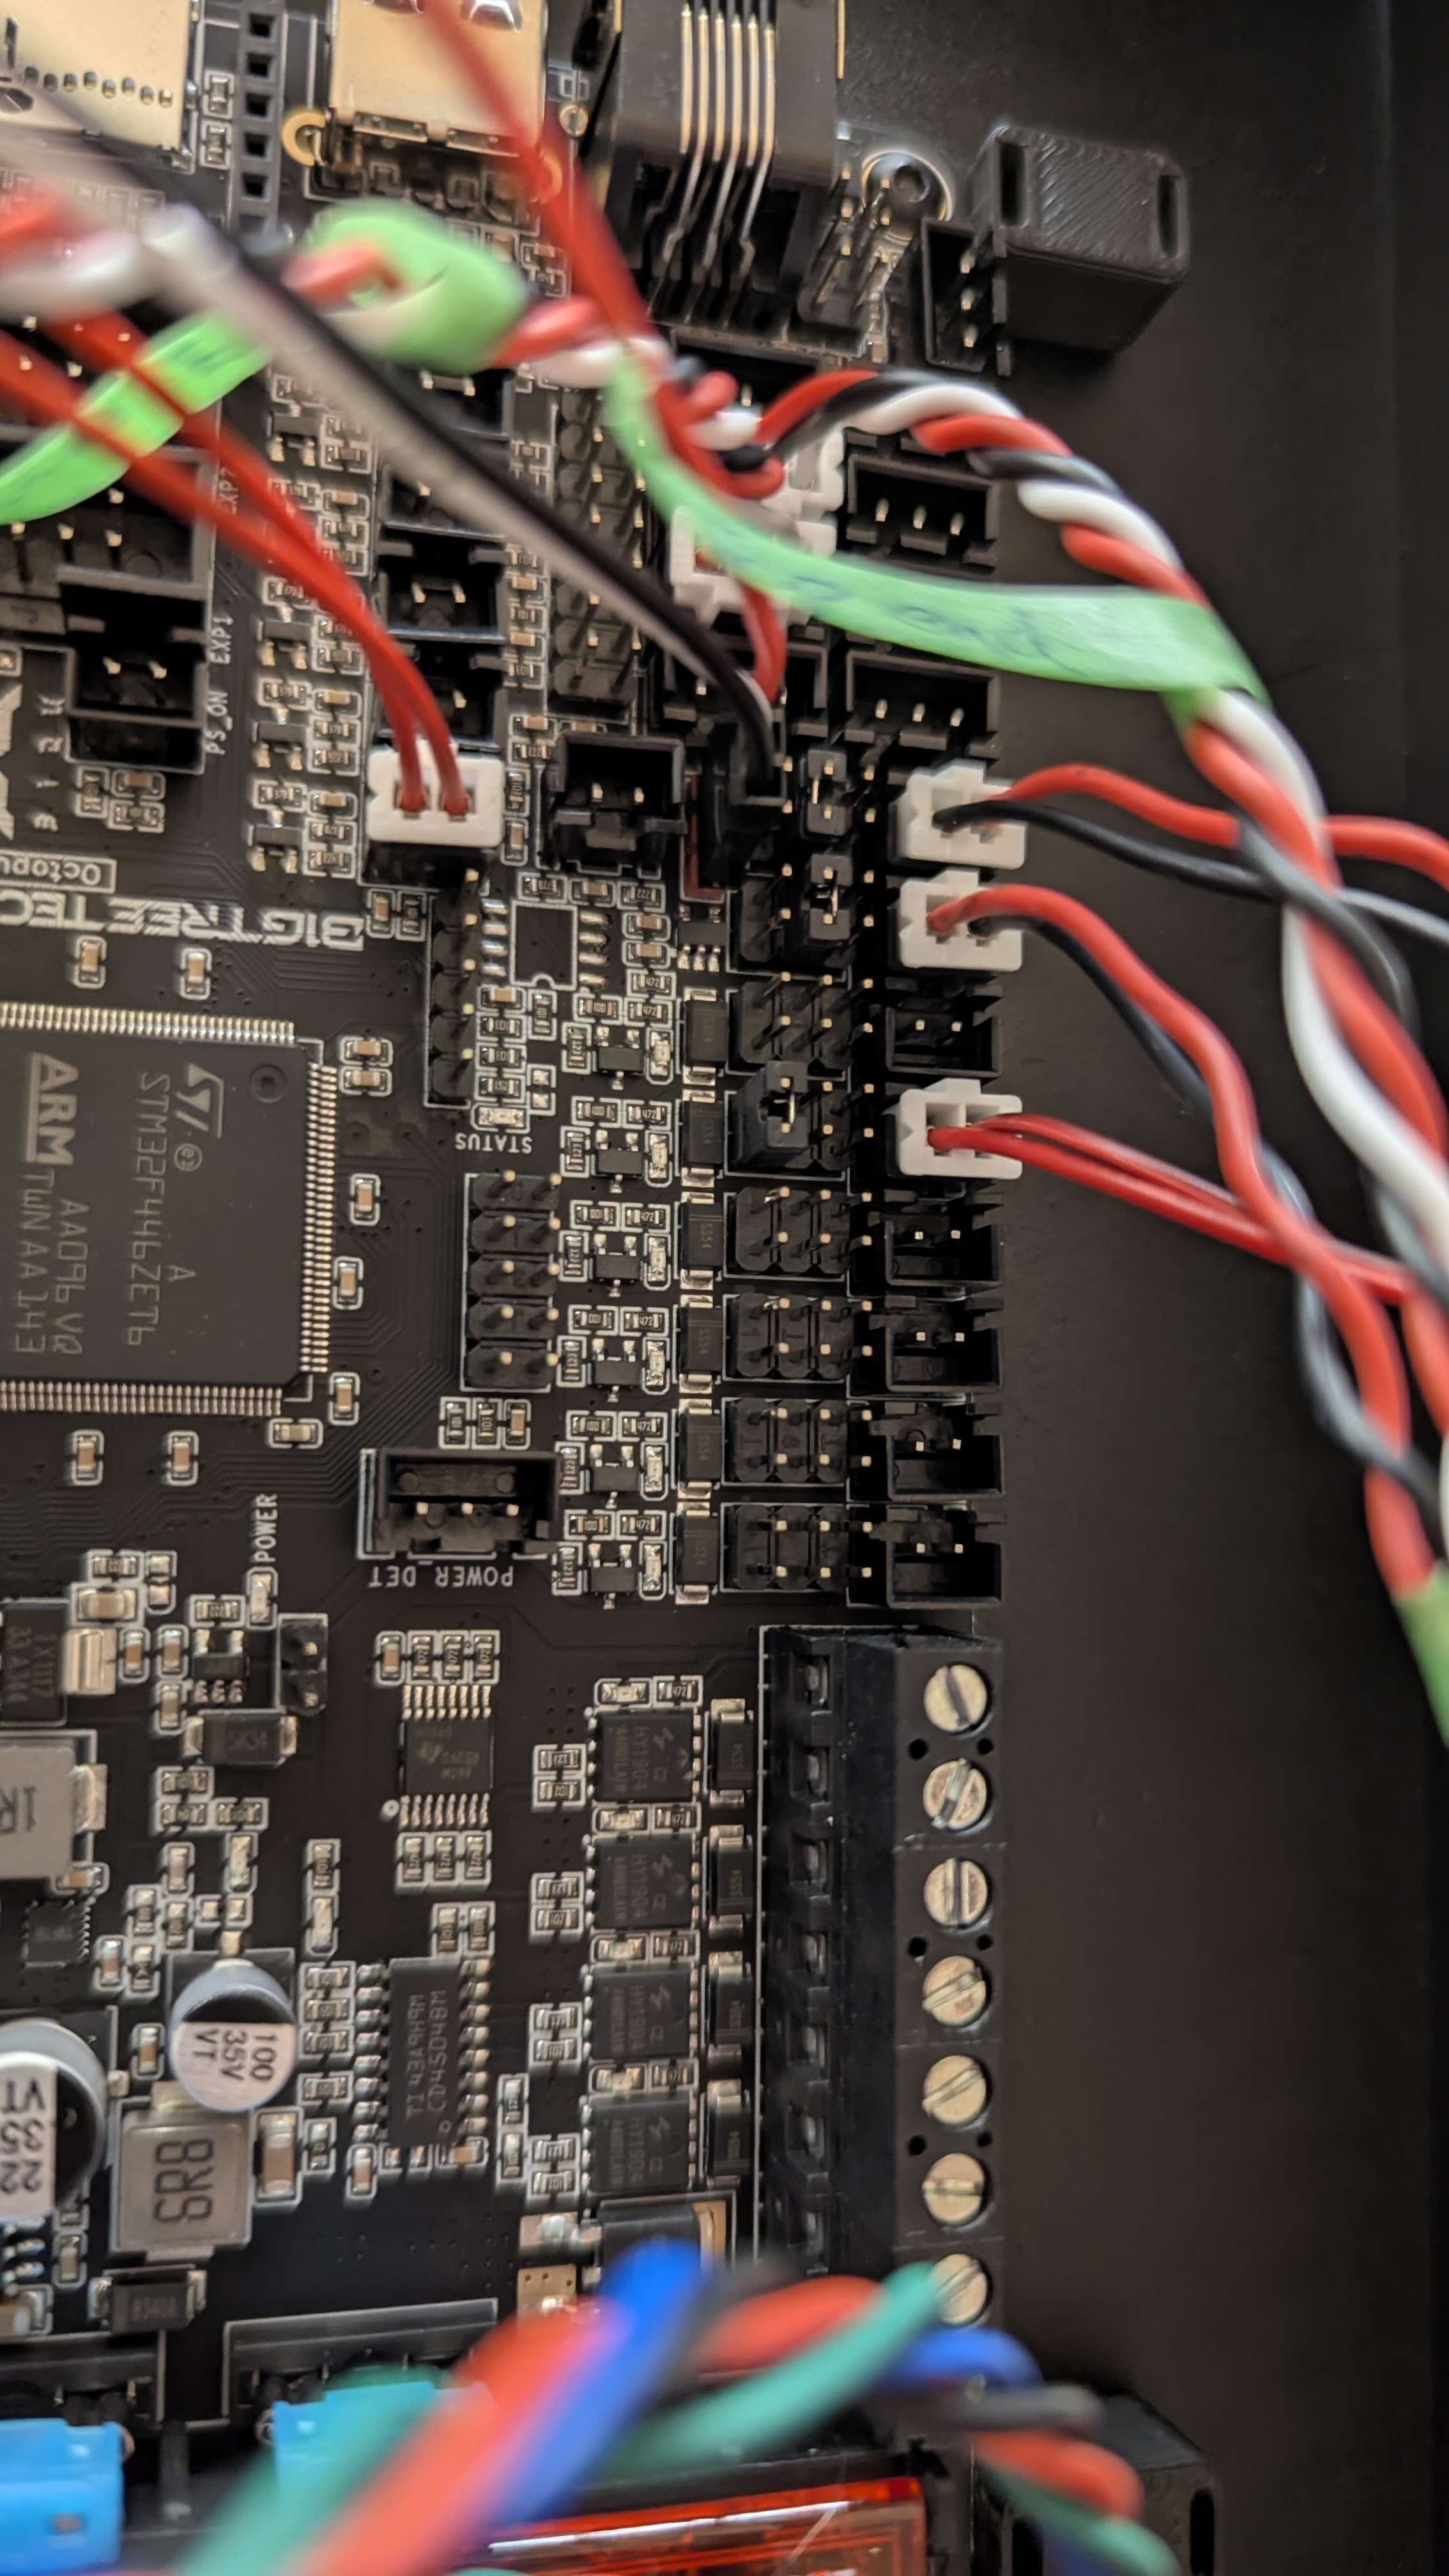
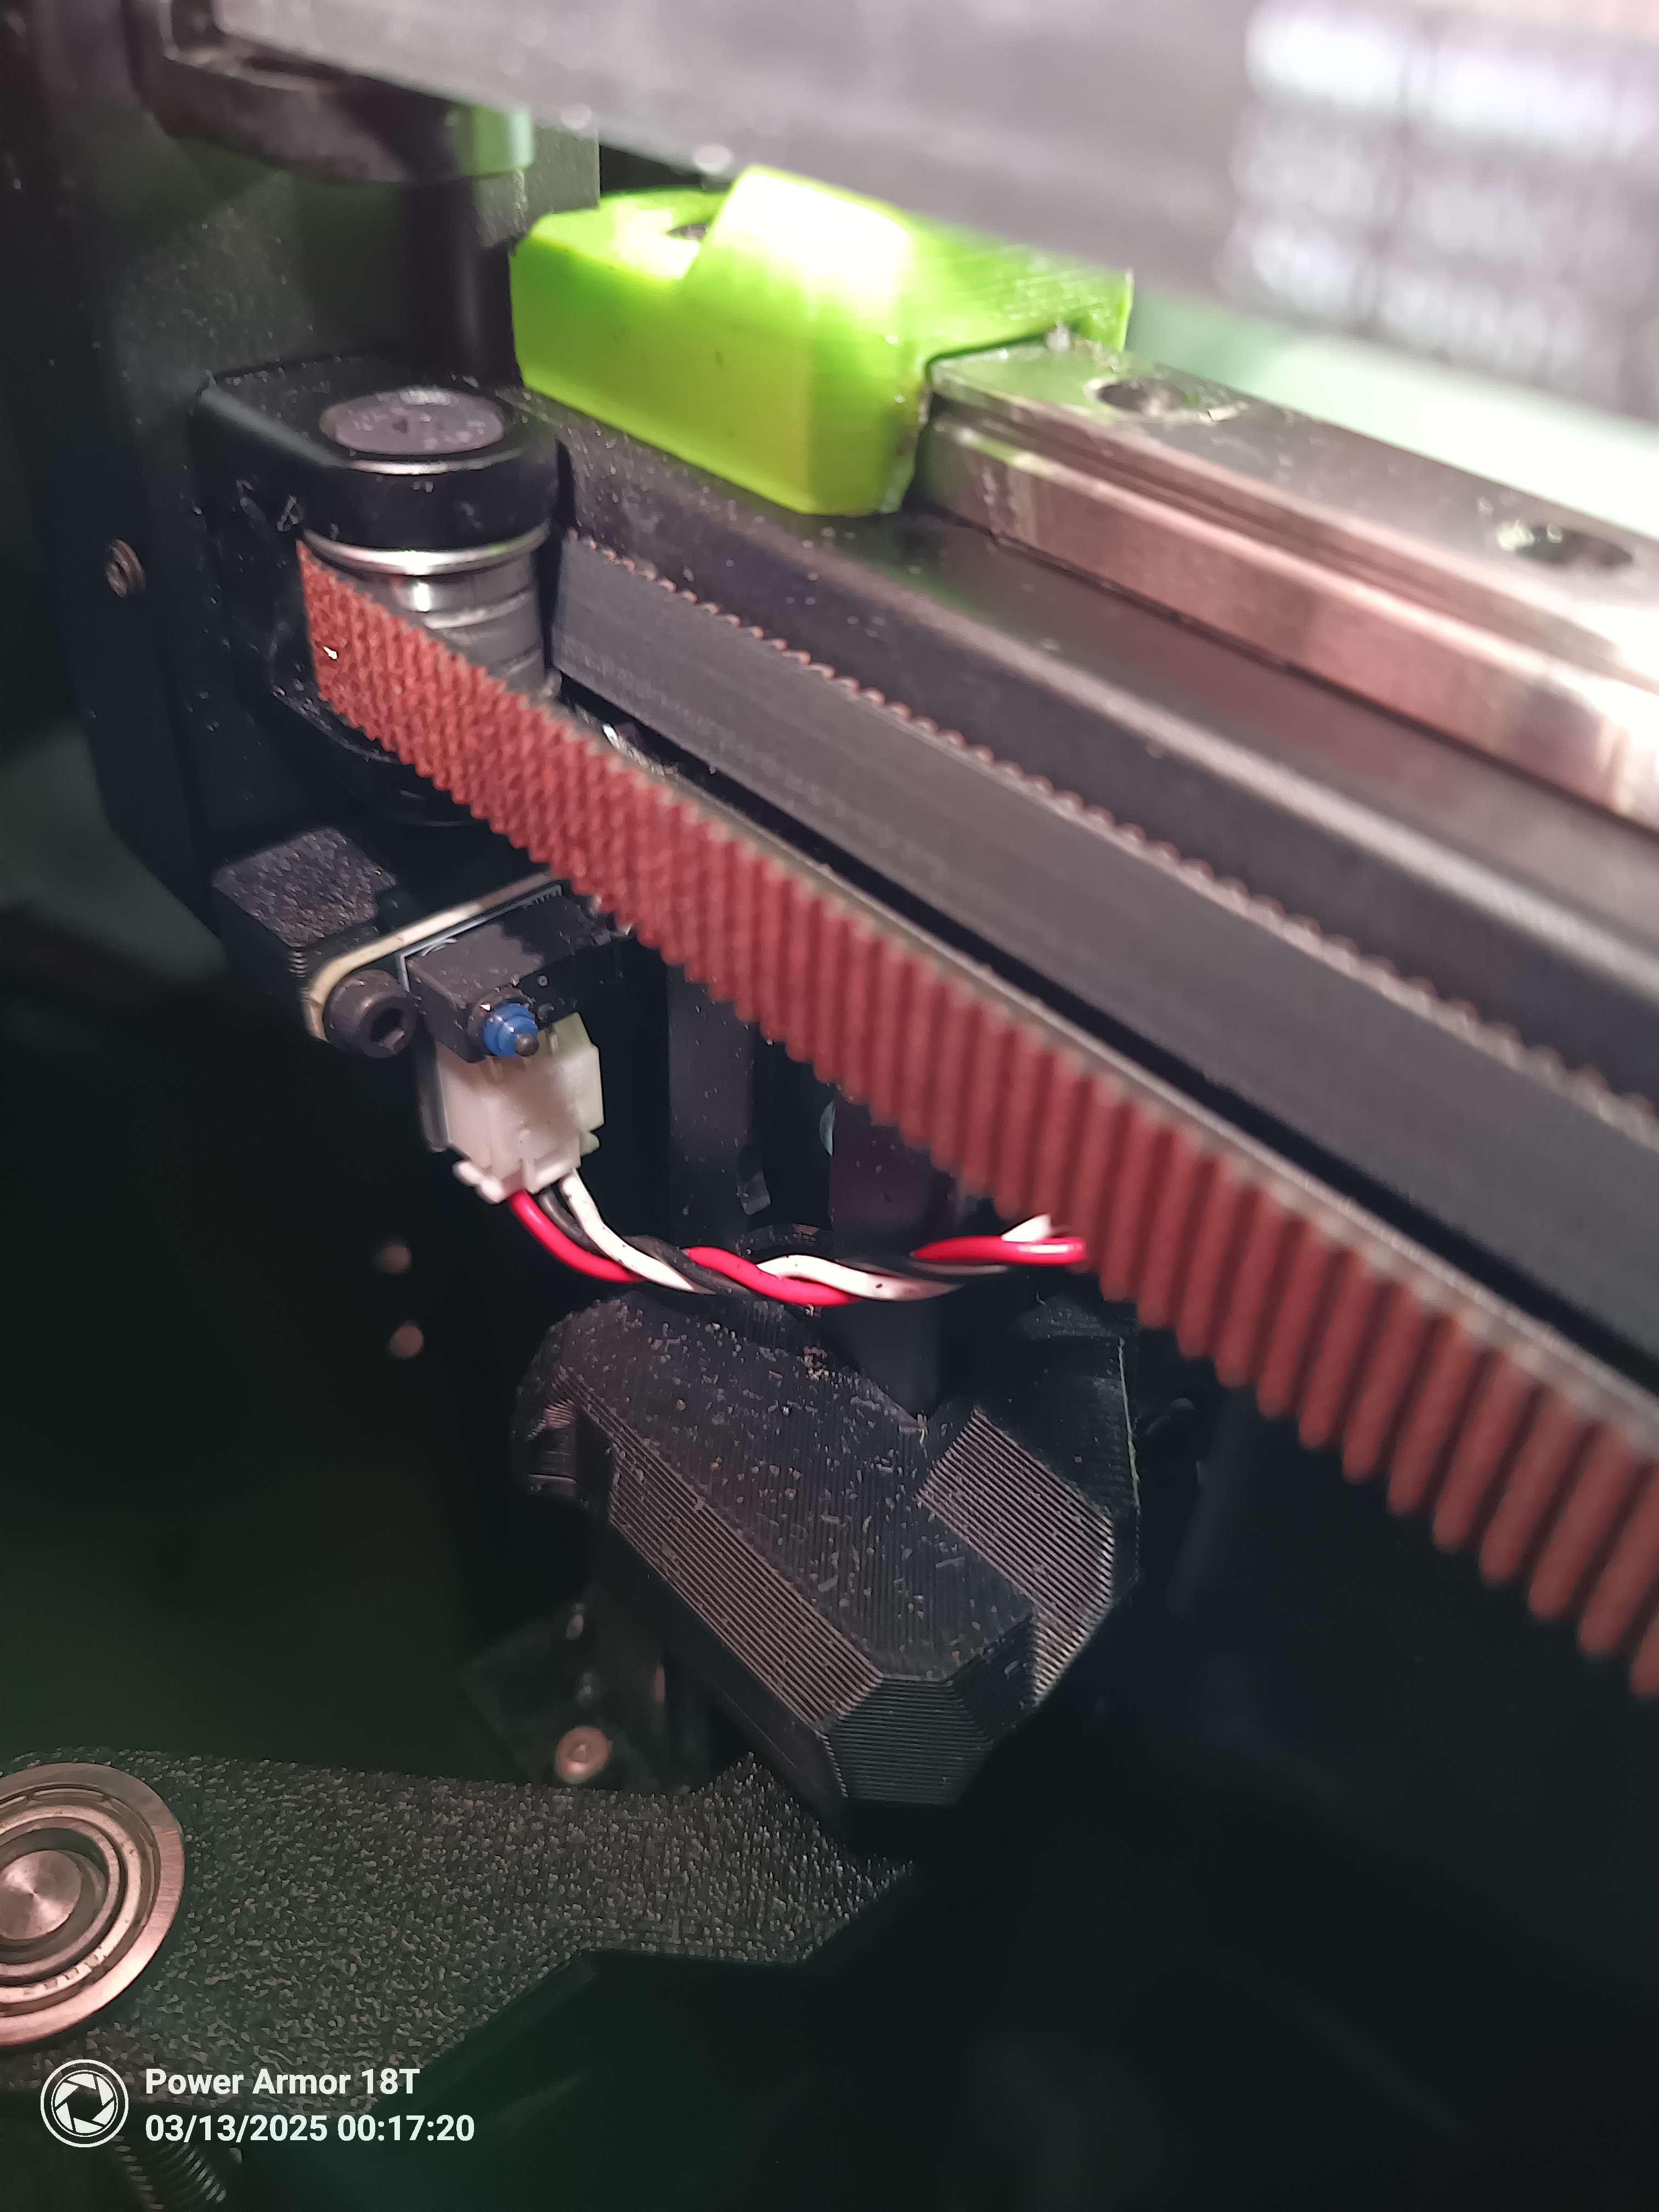
What does it look like on your board side?
Is this cable dare I say backwards. Wouldnt make sense but would make just as much sense for the wires to be flipped from the factory hahaha
hm good point
let me check before we get crazy
Hahaha
This is another cable
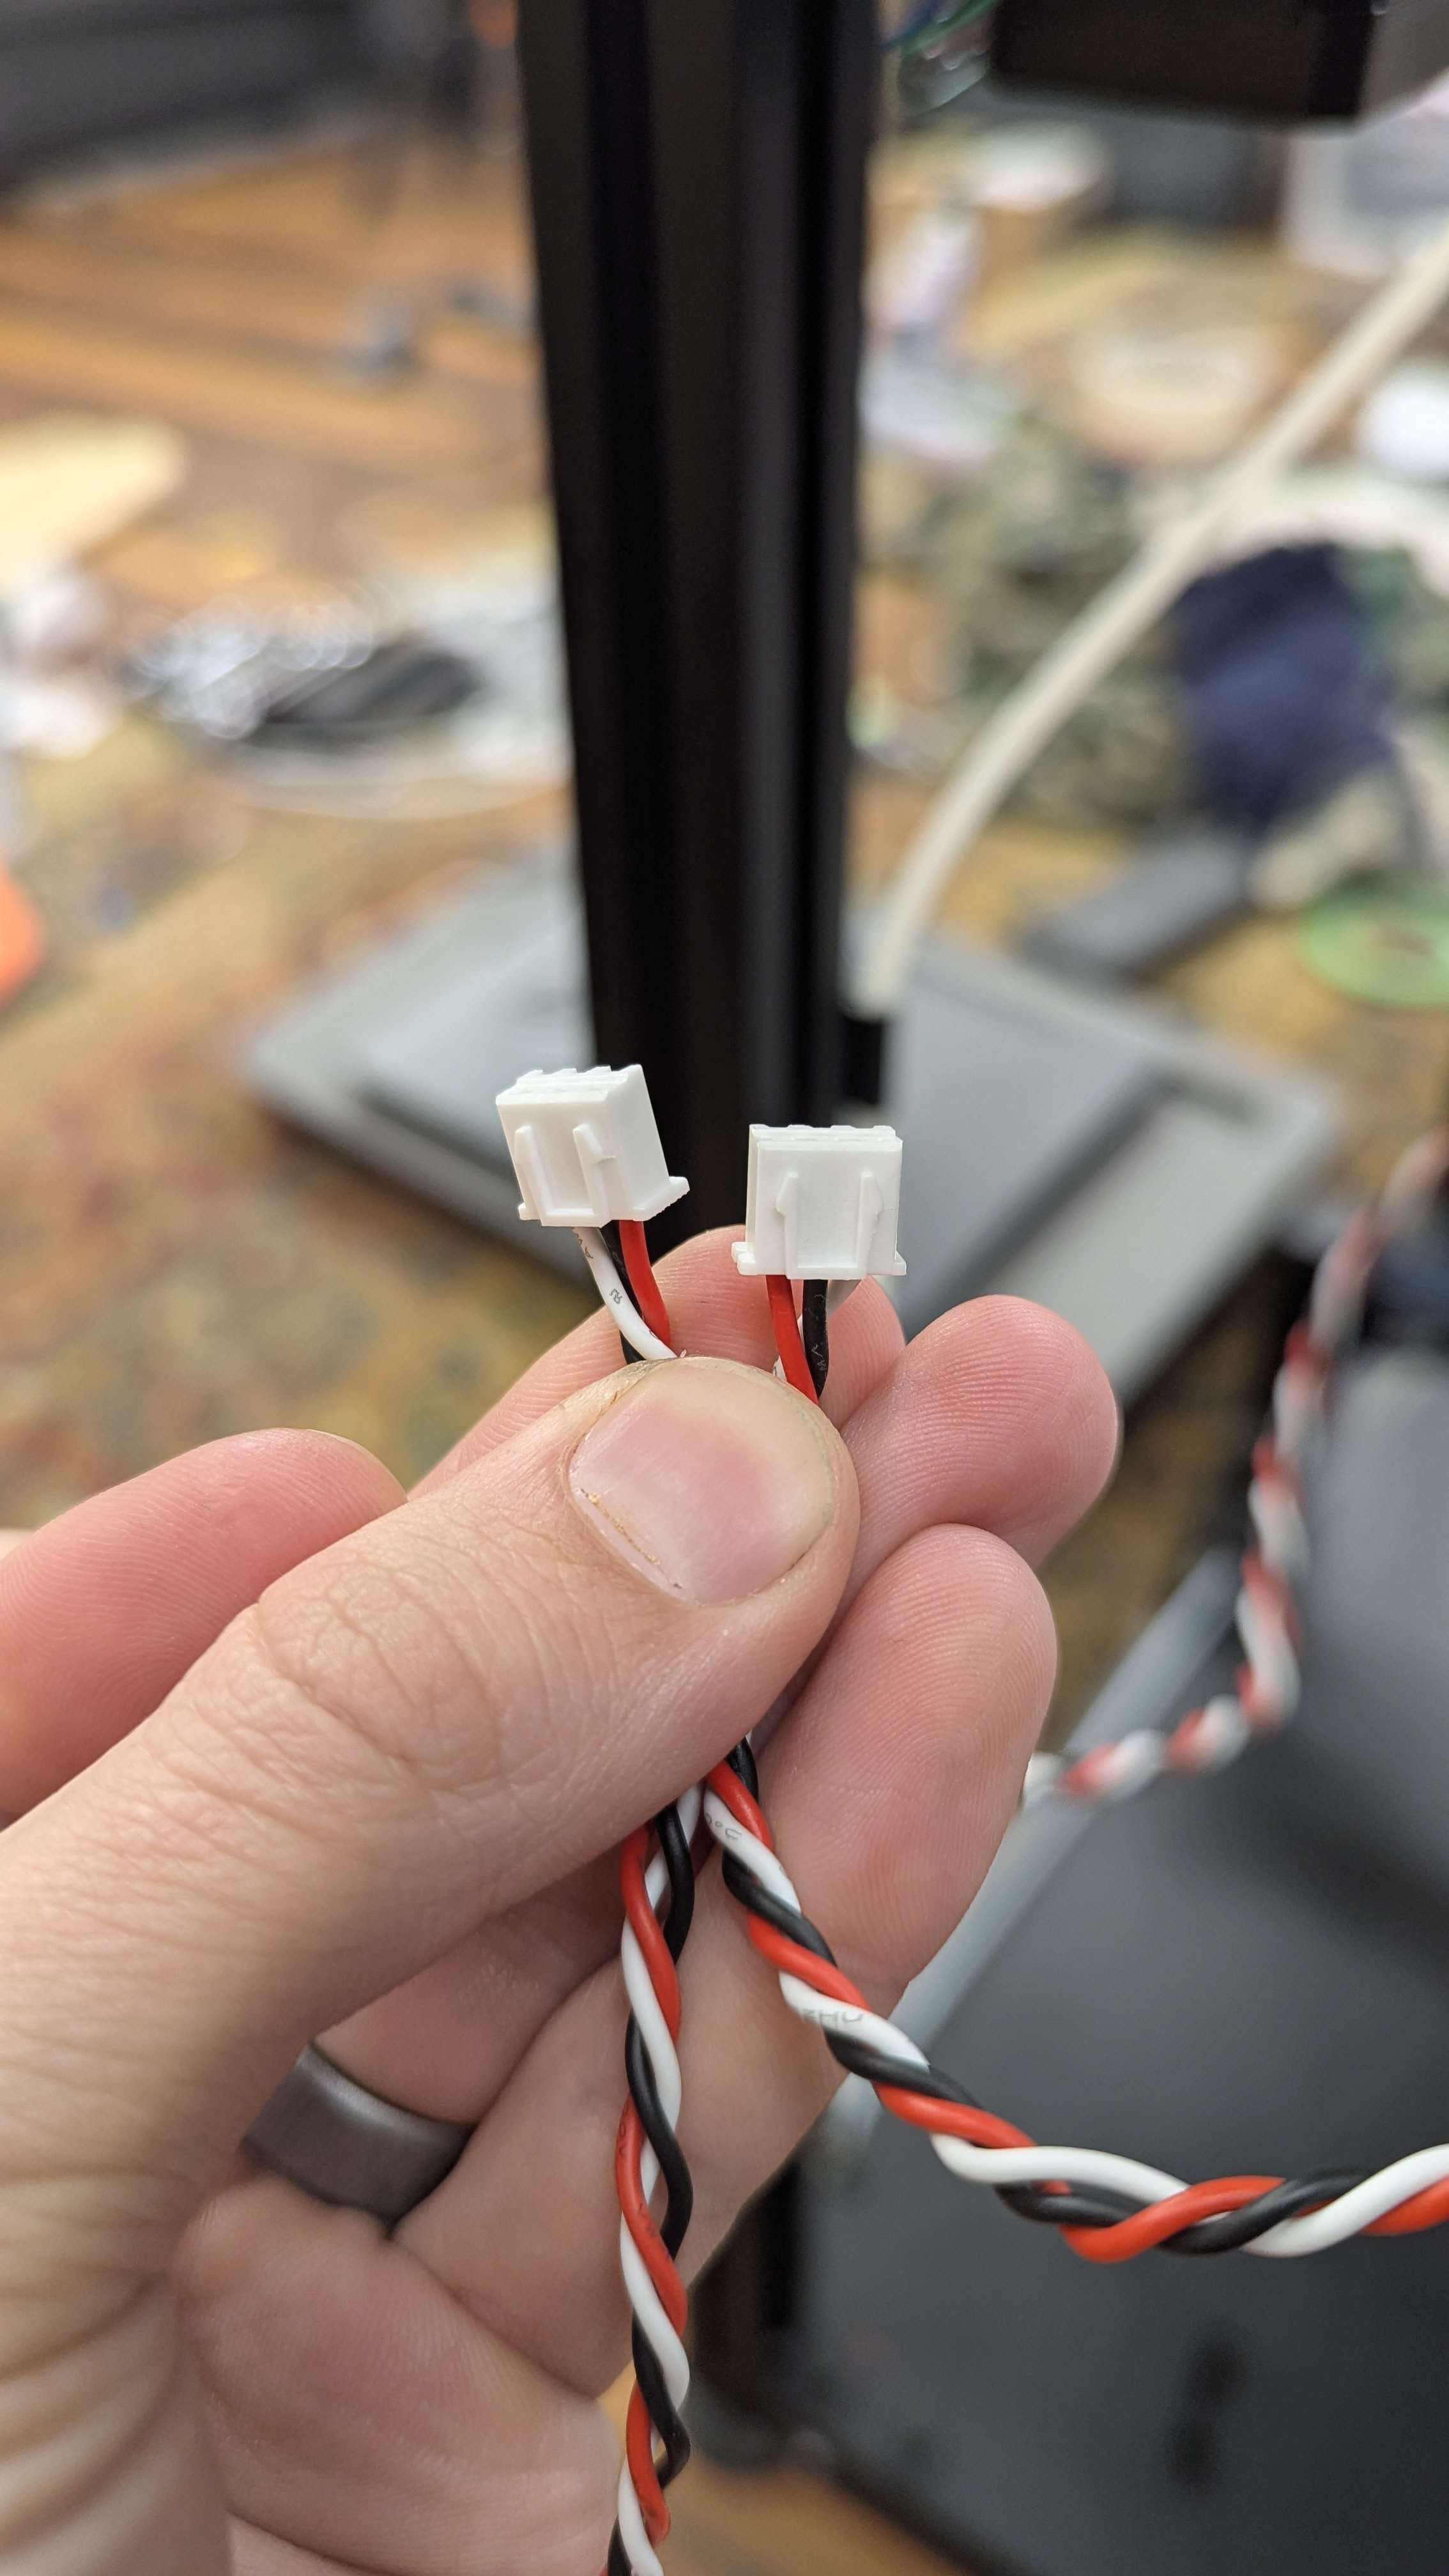
im 90% confident because the wires swap between your endstop and the board
This is the z one
But the z one doesn't work either
That cable for the y is definitely different from all the other cables...
my confidence is decreasing
because according to this, yours is correct
no its not
yours is still flipped
you need to swap the red and the black on the endstop side of your y switch
double check me, but that's what I'm eyeballing
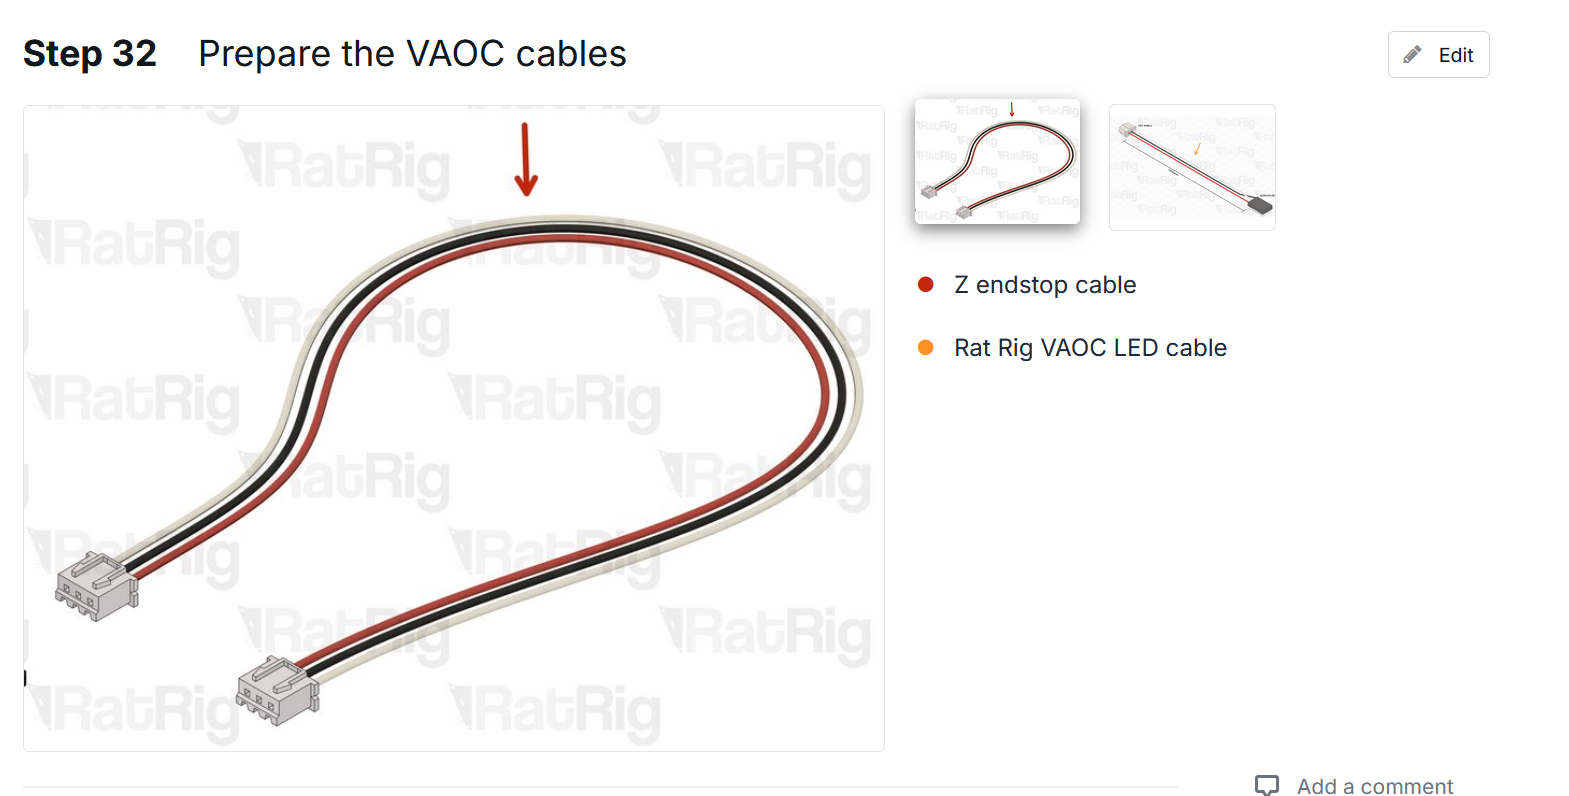
this image from step 47, https://ratrig.dozuki.com/Guide/12.+Electronics/250?lang=en
Rat Rig
12. Electronics
This guide is still in progress, as more detailed instructions on how to prepare all wires will be added in the next few days.
I think you are totally right I'll have to swap that around tomorrow and let you know what happens. The z end stop according to that is correct so I may have another issue there hahaha
Is it possible that this wiring messed up this octopus board and I'll need another one?
possibly, there are a few warnings that could happen but I'd keep moving forward
Sounds good! Thank you so much for the help!
you're welcome! For your Z, just double check both ends, I think as long as black is in the middle it doesn't matter what the two other colors do, as long as they switch sides compared to the other end
Ahhhhh there it is!
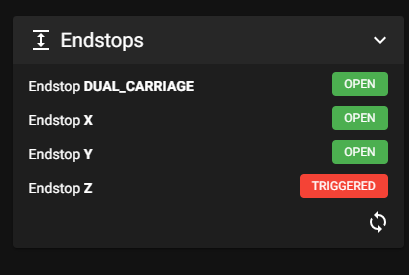
Okay! that worked for the Y the Z is exactly the same as the Y but it doesnt work lol one step forward
Config says its virtual? Is this my beacon not my z endstop?
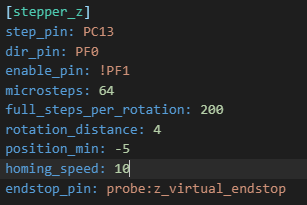
Well i found out my beacon wasnt configured so that is configured now but the Z end stop isnt working still IDK if the endstop is the physical button or the beacon now
I think this is correct
If you set kinematic center, then increase distance between bed and nozzle, endstop Z should become open
(be careful, kinematic center ignores endstops and limits)
Ahhhh okay I can try that! I'm actually heading to work now so I won't be able to try till later today
How close do I have to get it to register?
Not close, far. It's normally closed, so I imagine you're within a few inches of your bed currently. It's a pretty decent distance to register
Either way... If beacon calibration went through it's working 👍
I didn't do any beacon calibration... I'll have to find that too. I am also confused now what the z end stop is for that was part of the index upgrade with the camera if the beacon is the z end stop.
Yeah I did all that but the z offset just always says triggered. It is also good to know that the Y is working and when it was working I unplugged it and it switched to triggered to if it isn't detected or working it'll be triggered which is good to know. Do you have the index upgrade on your core v4?
Yes
Z offset will always be triggered, until the beacon is within range of the bed, around an inch. I think it's a reverse logic pin
So z offset it's this?
Wait
Ok it is very confusing
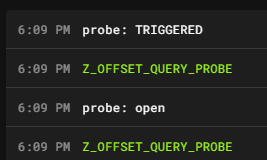
Z-offset in the endstop checker is the beacon assembly.
Z-offset when you do Z_offset_querry_probe is that actual switch

Hmmmm

never mind on the VAOC probe error got that one working
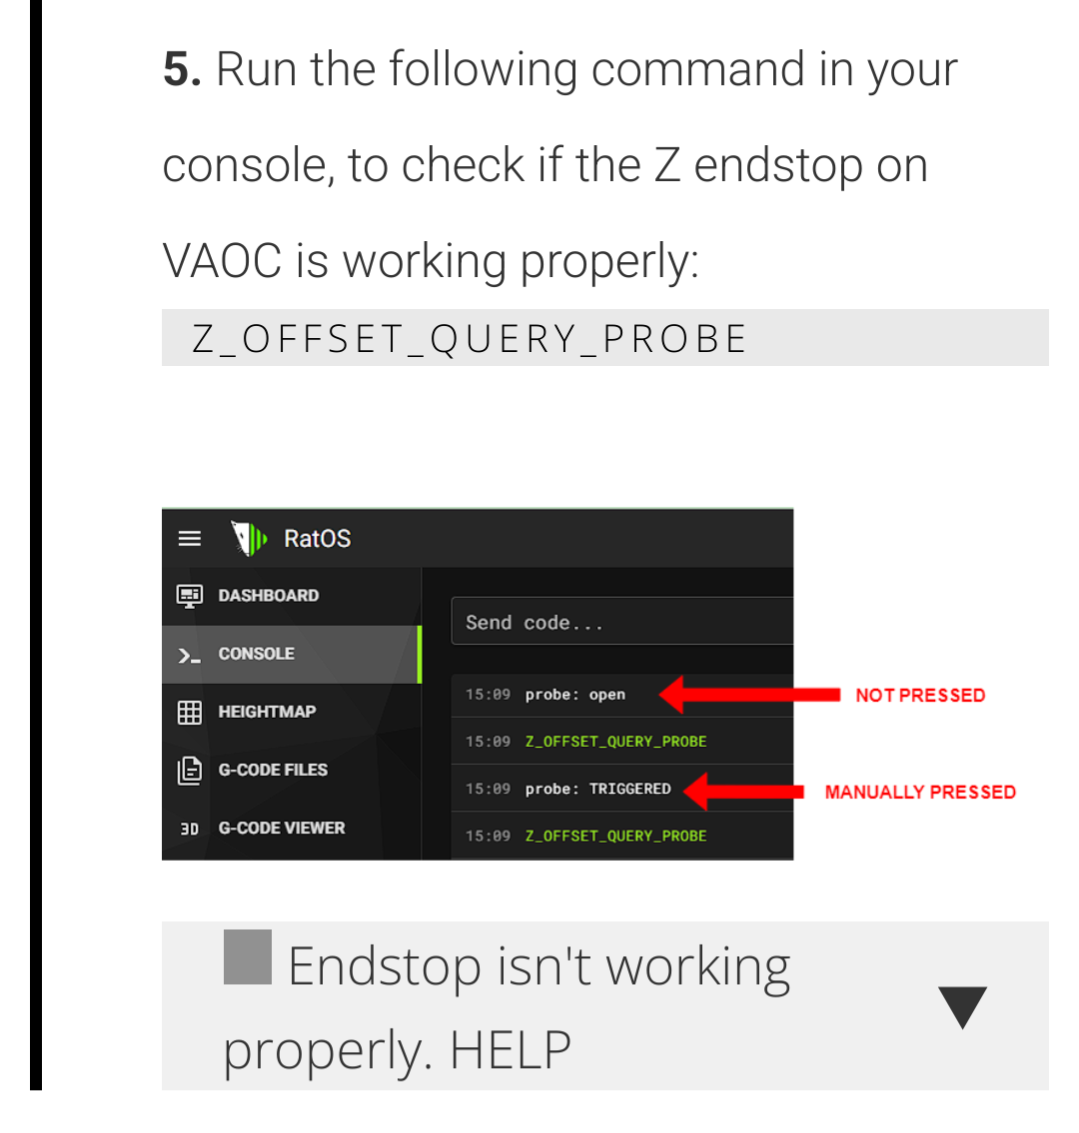
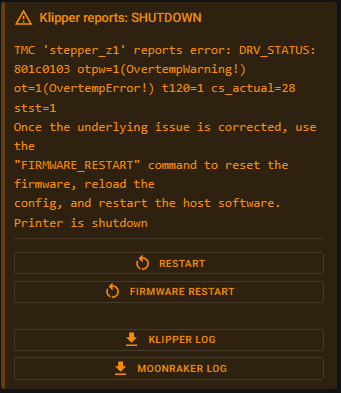
Another wall.... I have followed everything in the commissioning guide up to this point...
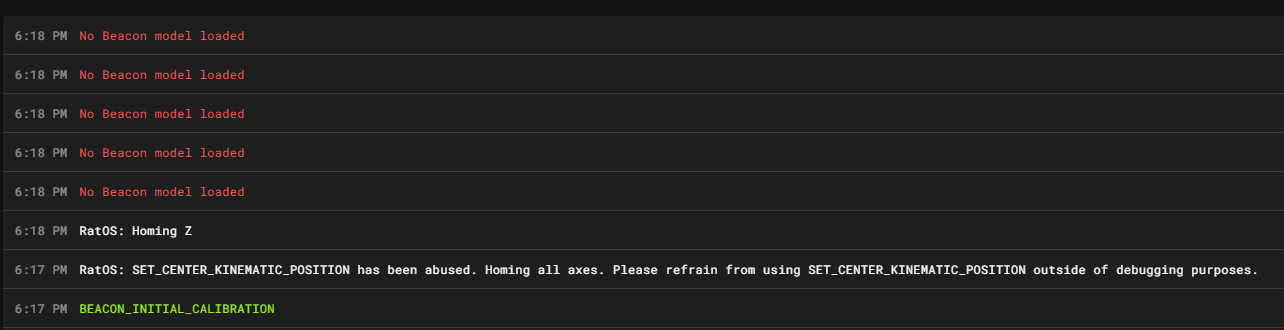
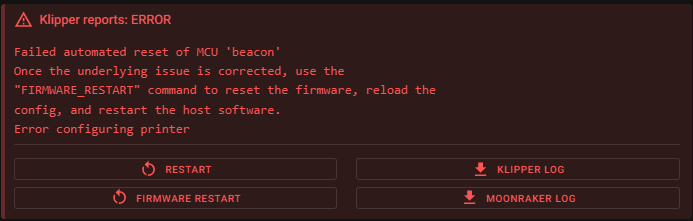
I reinstalled RatOS and started new... I am not getting the same error now Im getting this now after getting to the same part of the commisioning guide
well fixed that.... Beacon wasnt plugged in all the way now im back to the missing model

Okay so the issue was the kinematics line I was running to move the motors wouldnt allow the load of the model. But now I'm having another issue when bed leveling... 😅
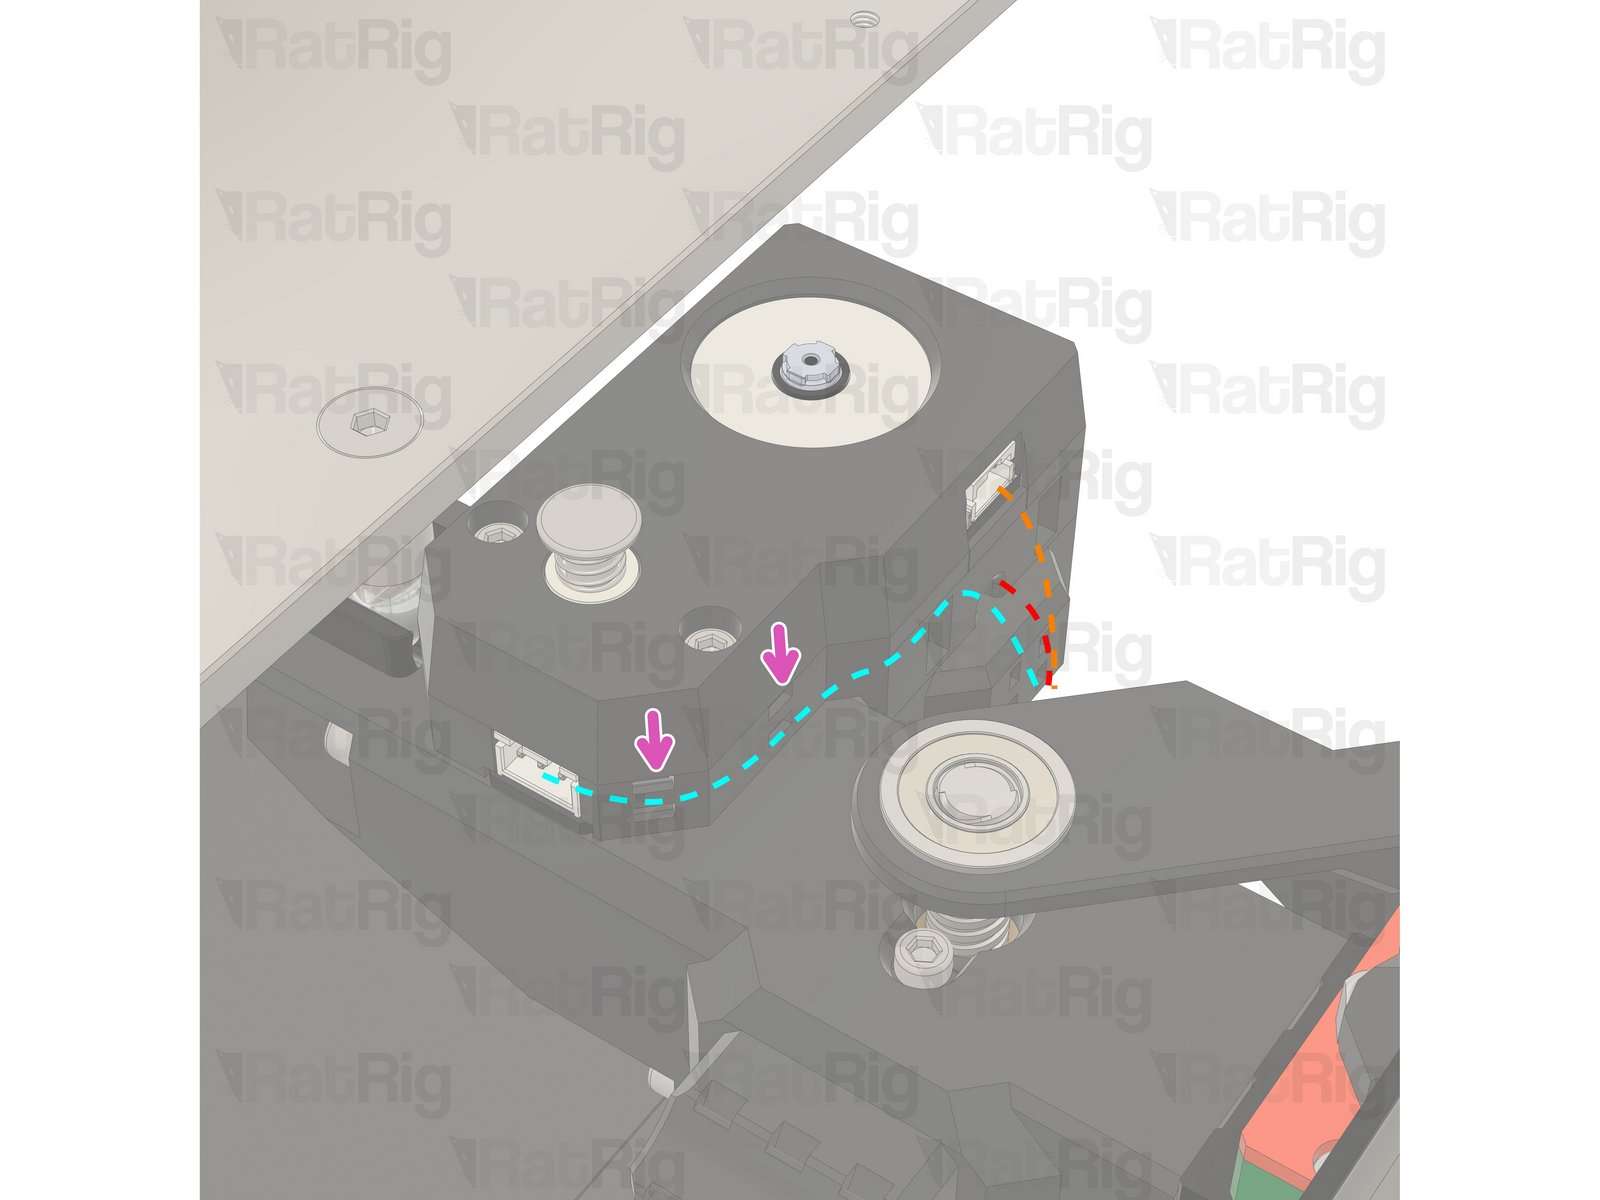
Every time I level and the T1 extruder is closer than the T0 to its end rail it runs into the end stop like th video shown. Is T1 supposed to move when T0 moves causing this?
Make sure none of the wires are blocking the T1 from hitting the endstop. Manually move it over and make sure there's no force to get the endstop to click.
Additionally, if you can send video of homing only X that would be helpful
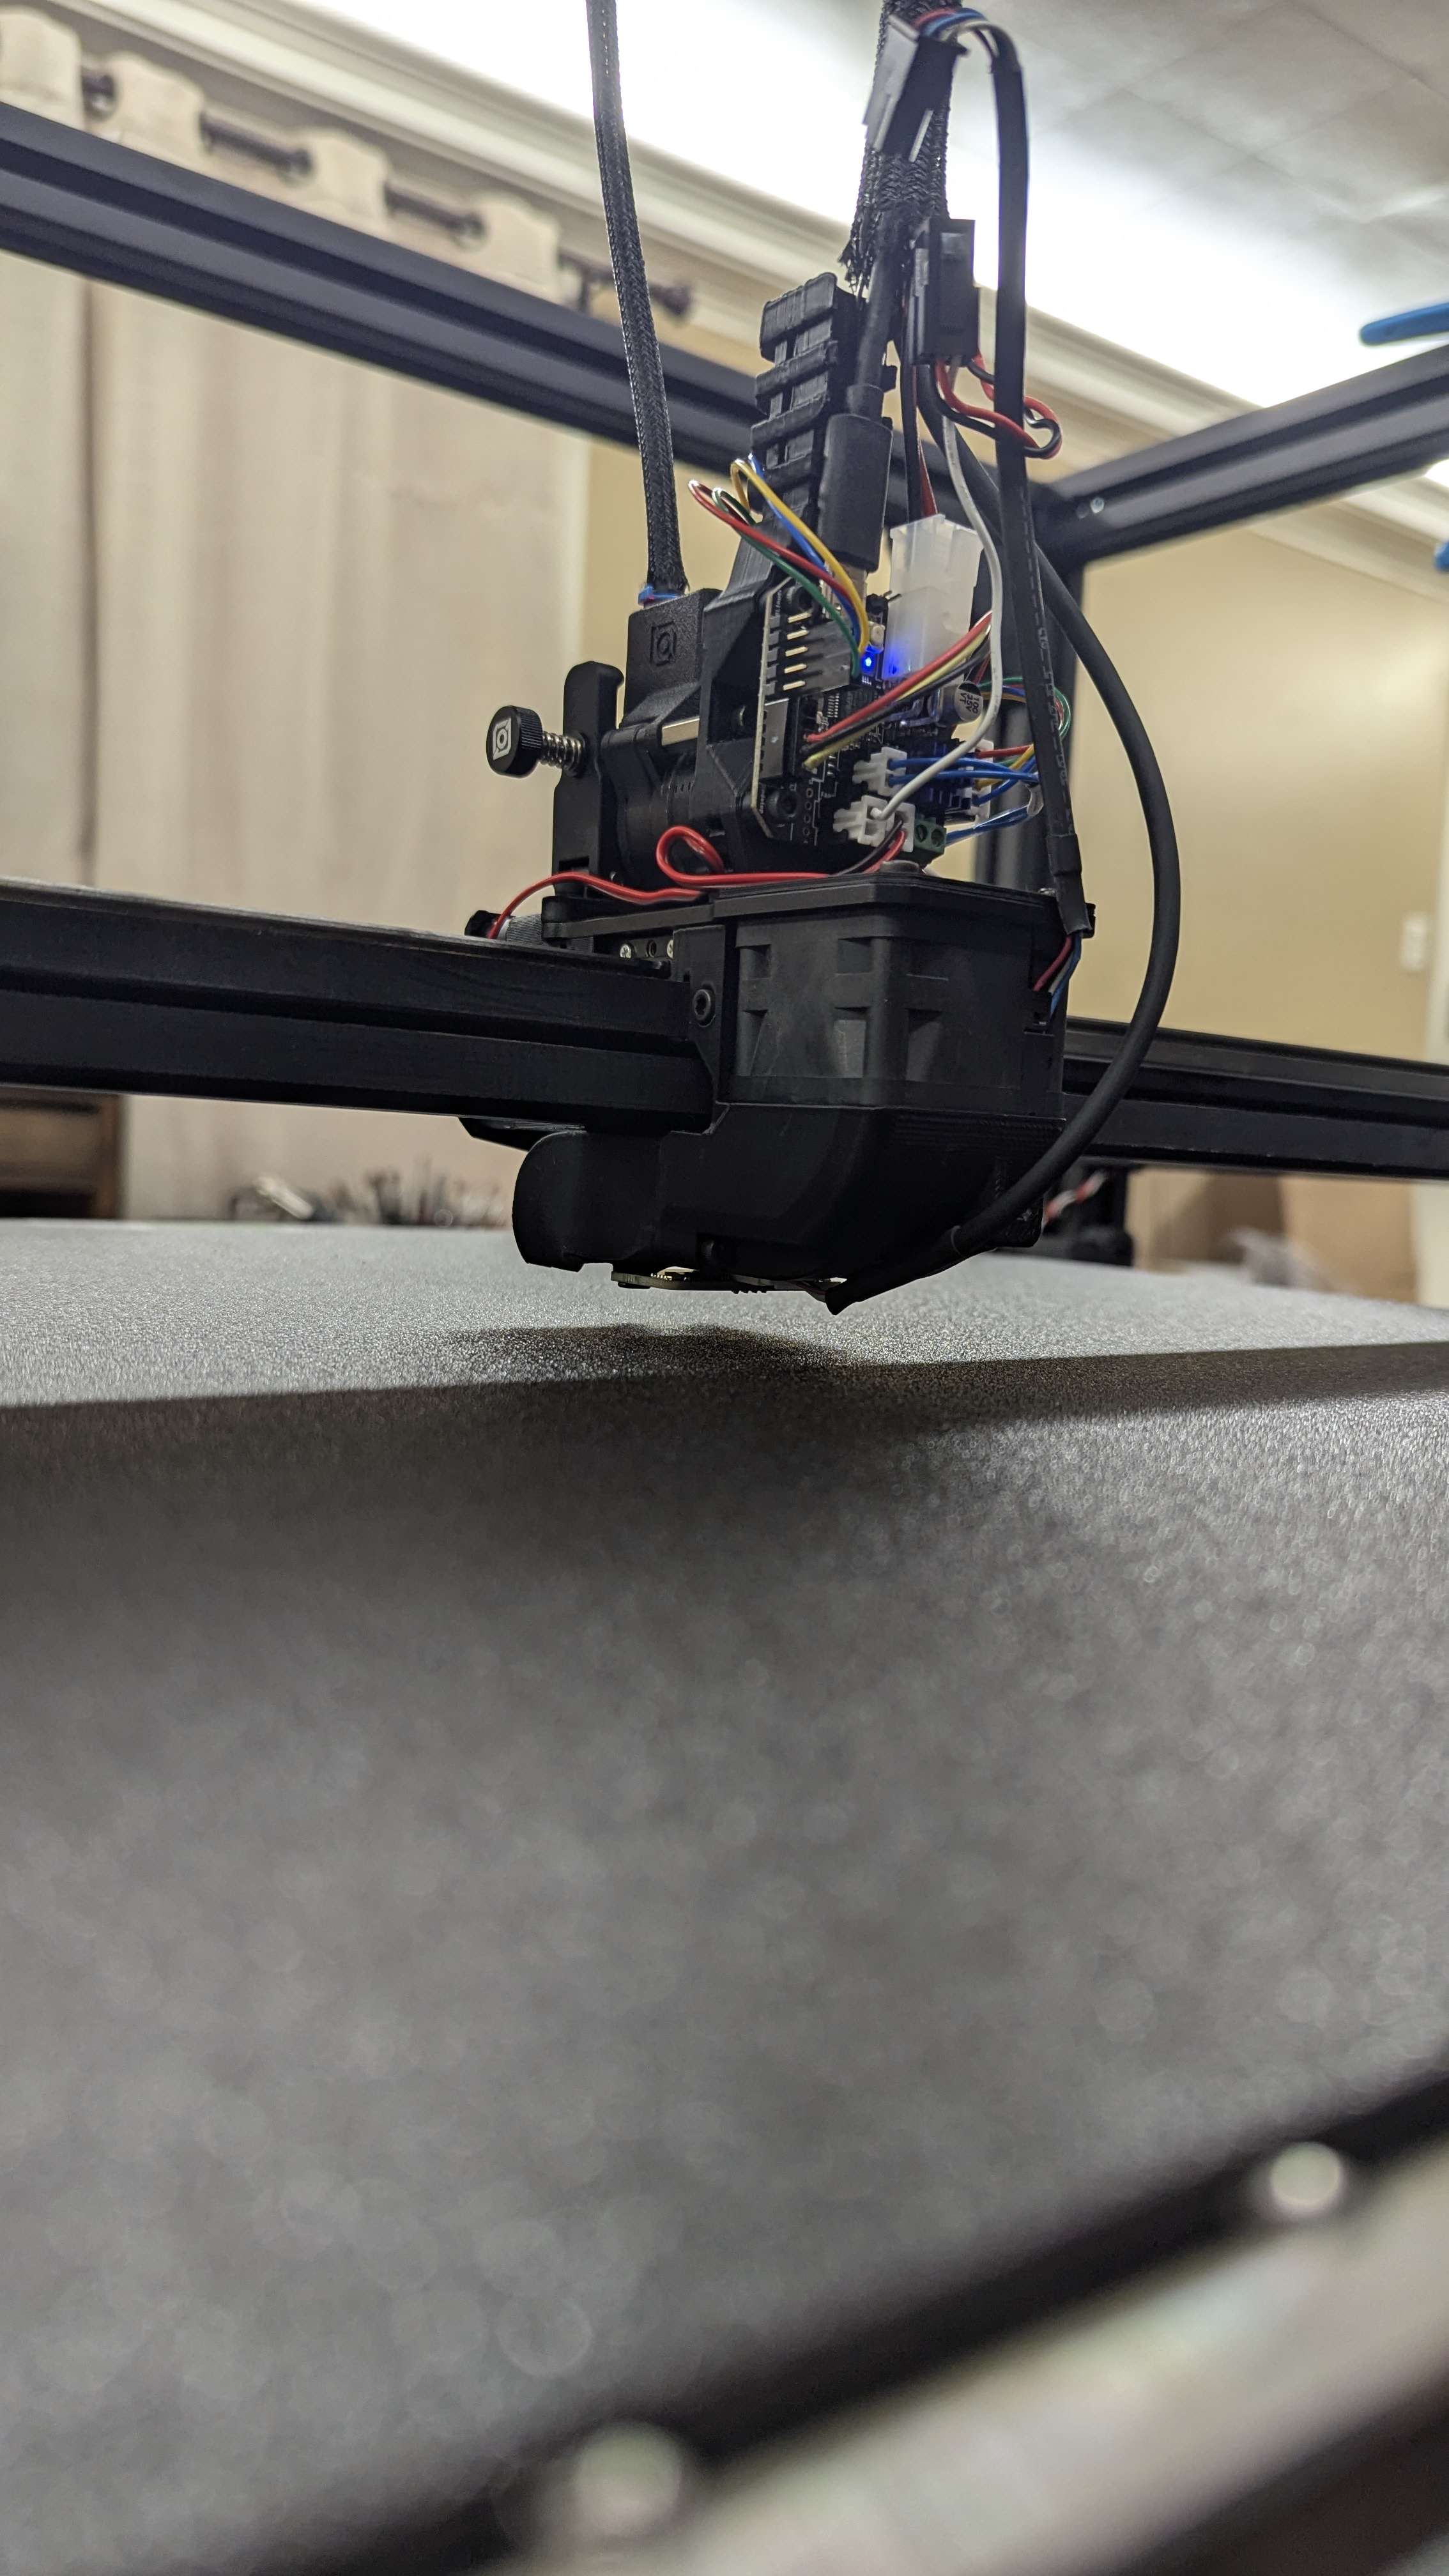
Also please please please zip tie your cords now

The strain on that USB C will snap it off
I can definitely do that! I'll ziptie first thing when I get home I actually recently cut the one that was there off to chase the wires for the trouble shooting. Thanks I'll get that info later today
Hi, Ive just founf this thread while searching for a issues im having. seems you had the same but found a fix? im getting the error above ref the unknown command for probe. could you let me know how you fixed this please?
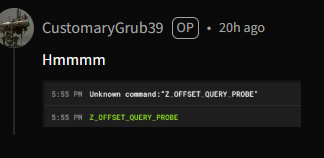
Hey! I believe that was because I didnt to the Z offset section from the commissioning Guide here
(INITIAL Configuration for IDEX) Section
Above
X calibration only video
Nothing in the way of the T1 extruder endstop
Is it supposed to be moving the T1 head so much?
Oh you sweet summer child you've reached belt tuning time
hahaha i have actually gotten to that part! doing the first set of Shaper graphs
Also your diagnostic pics that you send :chefkiss: thank you
at what point to the top belts go on?
hahah thanks!
:kekw:
Ok hold on
it says it will tell me to later but I scrolled ahead to see because i was afraid id miss it
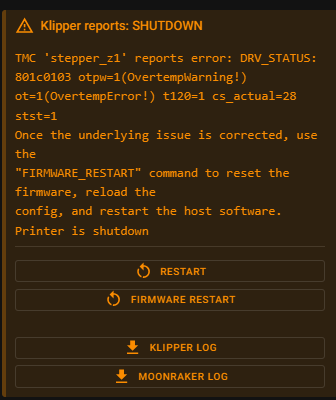
also when i go in performance mode i get this error so i turned it off for now... idk if thatd dumb but it kept failing...
That's fine we'll keep it off for now.
The calibration step in the comissioning guide is where you add the Y belts
You'll first tighten up the two bottom belts as instructed (against the rear motor plates)
Now is a good time to verify that your motor plates are fully pushed back and against the vertical extrusion in both x and y
Then you'll add the Y belts
Did this happen IMMEDIATELY after enabling it or after some time?
I am here now.... past that part...
No it was like 1-2 min into running around
Im taking a wild guess, without the electronics enclosure fan enabled?
Or on?
hehehe you know me so well now :kekw:
:kekw:
That'll do it. As in the warning, performance mode NEEDS active cooling
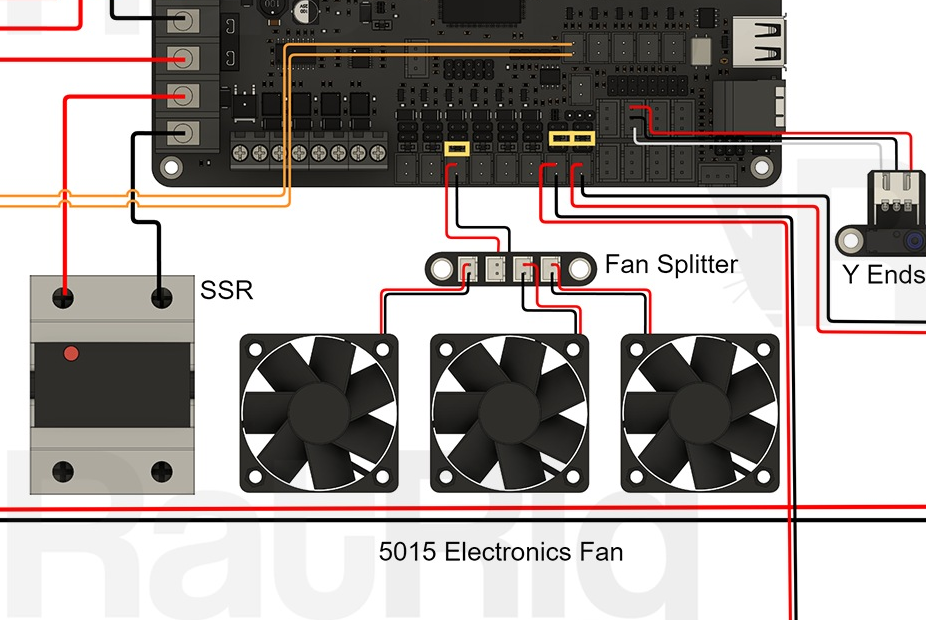
ill wrap all that up and put the enclosure on. do you know what part the fan needs to point at?? there was no guide for the big fan i have
Now go back to the IDEX calibration step and follow those before moving on... These steps are beyond critical
The fan needs to be directly over the stepper drivers (top right quadrant) and should be blowing IN to the electronics enclosure
You know it's blowing in as the fan blows in the direction of the label (i.e, if you're looking at the label it's blowing at your face)
all the way back to initial calibration?! or back to the part that says to turn performance mode on?
Need to go to the part labelled "gantry twist" and do that
After you perform the gantry twist section with only your X belts on, then I'd add your Y (yes I know it says not to but I think that's accidental instructions from Hybrid and not for IDEX)
Did you make sure when you put your x belts on that they were exactly the same length when cut?
Sweet! Yes I did make sure they were the same length
so i didnt see anywhere in the guid which header to plug this fan into there is the 3 fan thing they say to plug in do i do it in that port at that voltage?
Cooling fan should have a 2 pin lead I thought?
Should be 12v
Yeah that looks right
Hmm but the jumper looks like it's on the 5v setting
sweet but to middle jumper instead of 5v for right jumper
Idk, maybe the fan is 5v
hmmmm
Double check the fan label, it'll say :)
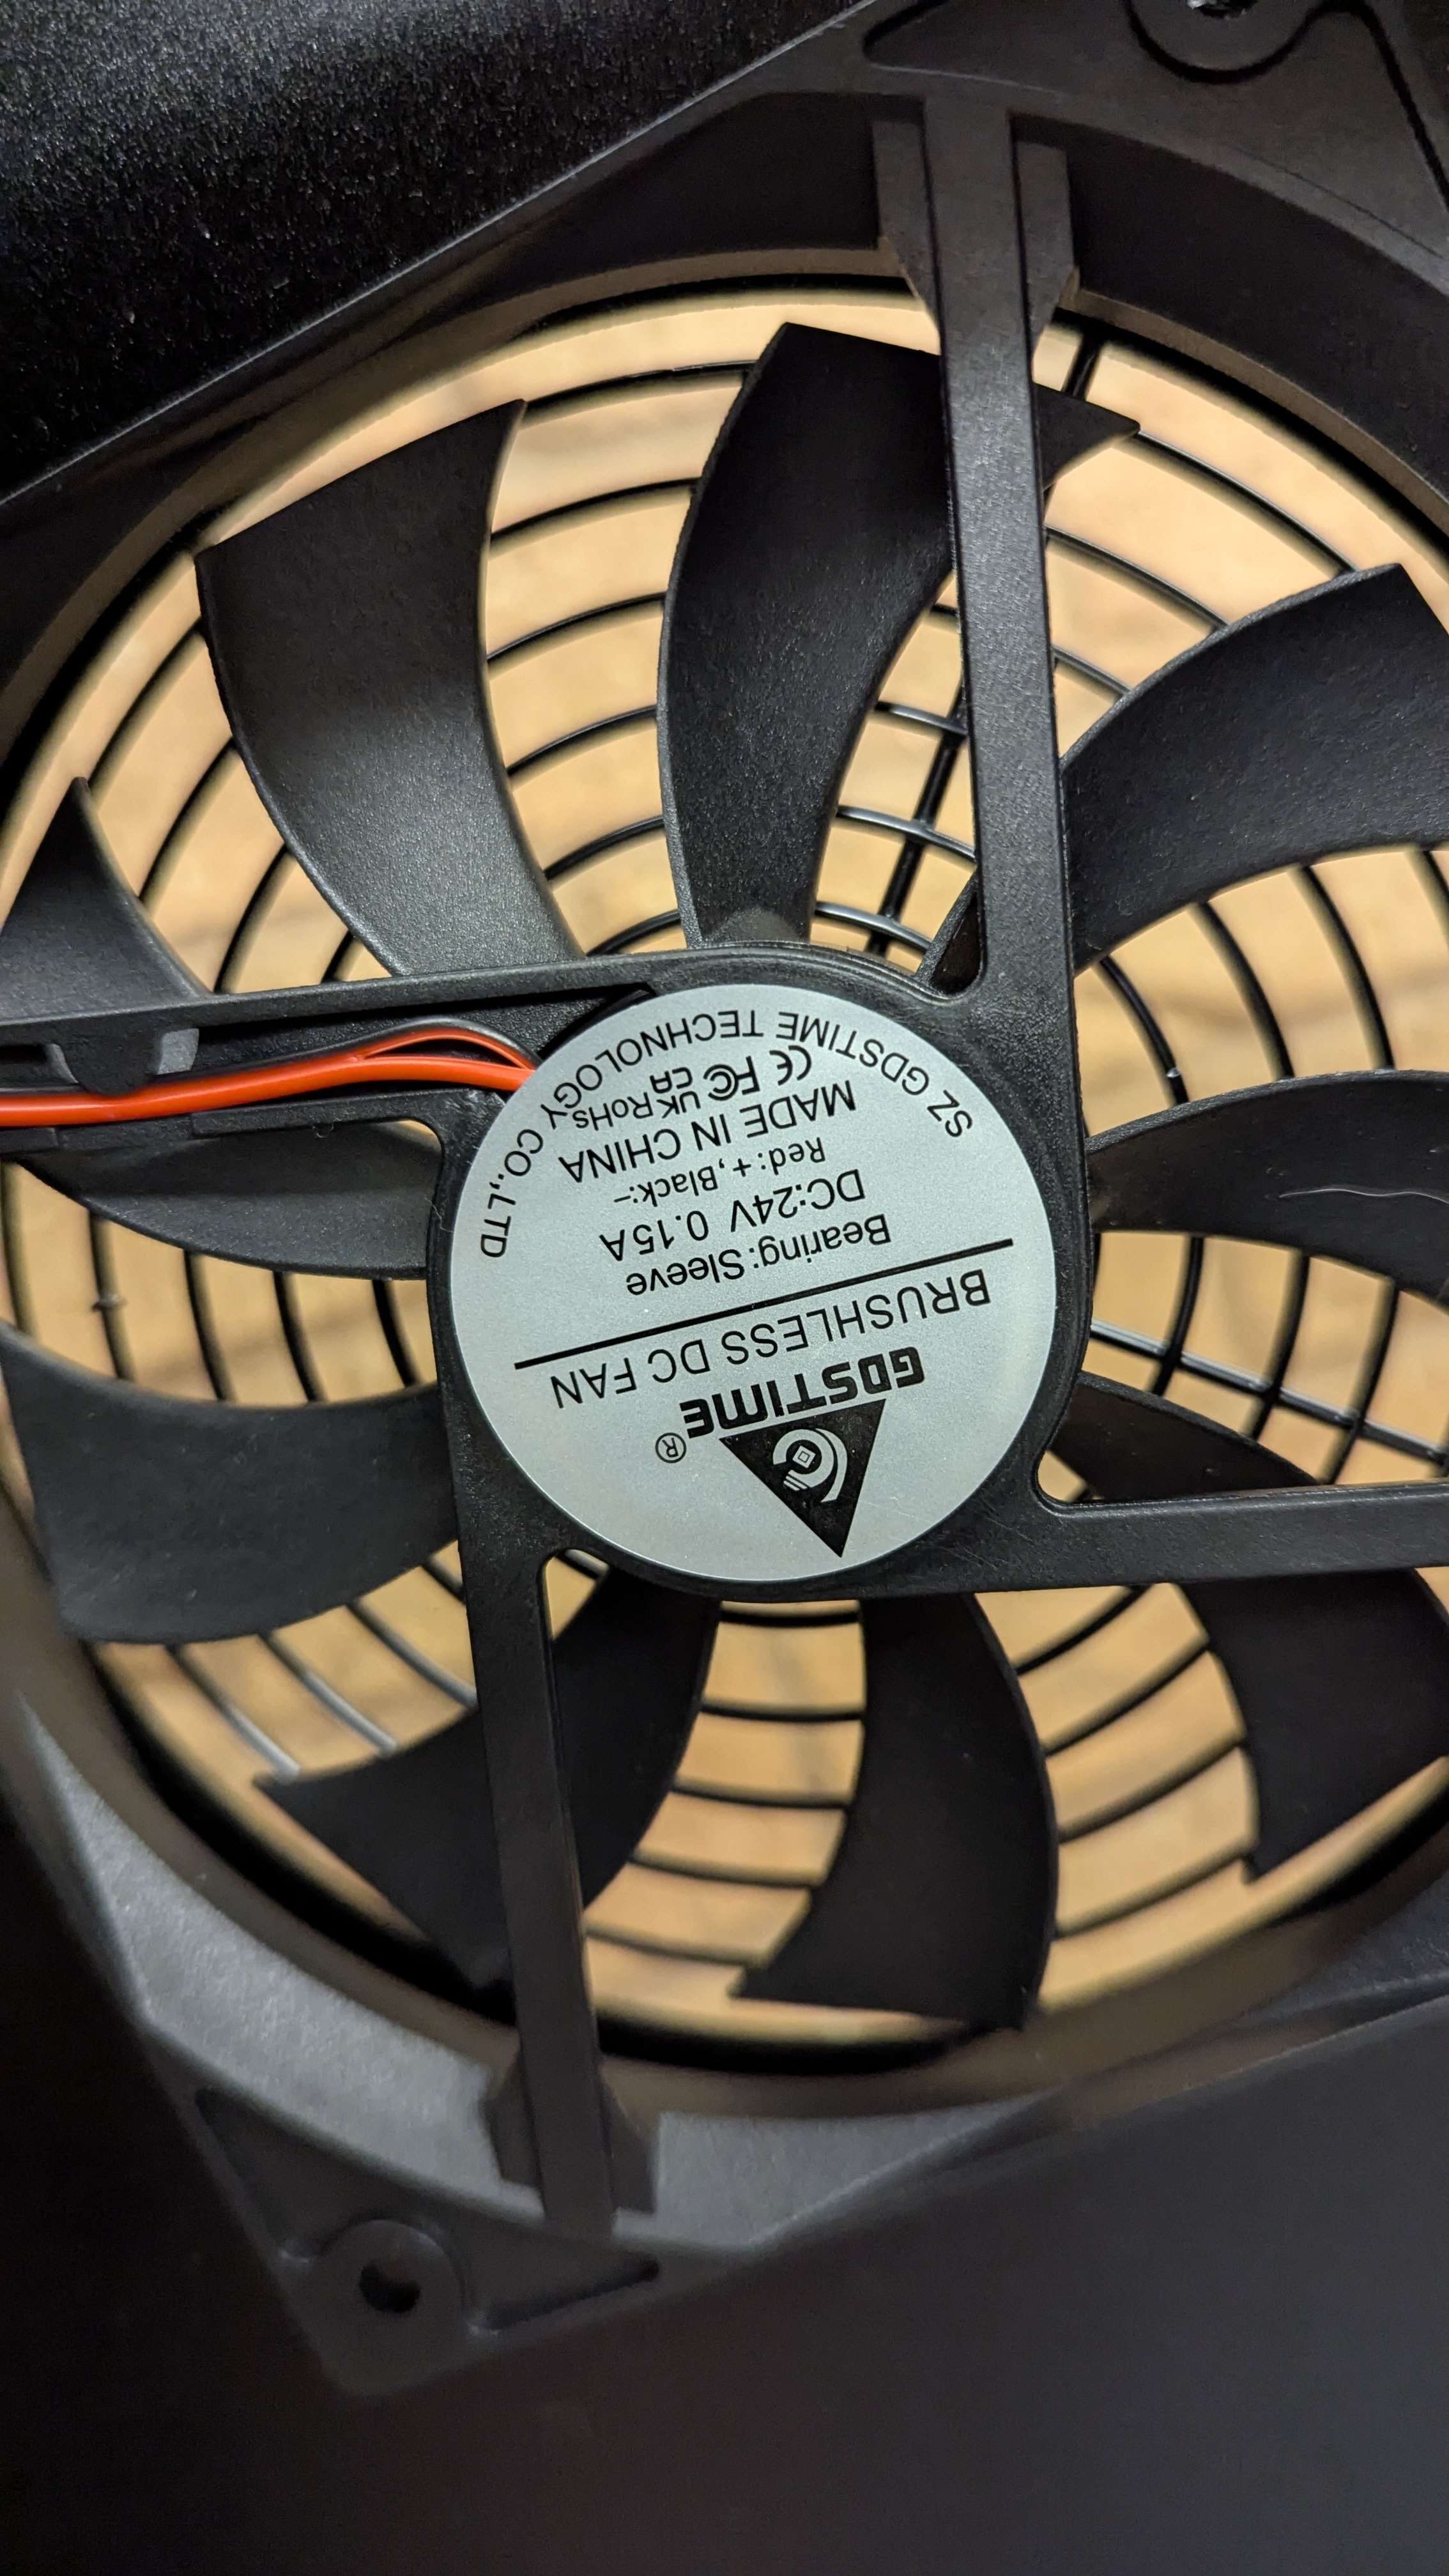
Says 24v...
Lol 24v pin it is
hahaha
also thanks again so much! wthe documentation is super helpfull but seems to miss stuff..
or n ot be fully up to date
No worries, had the same questions and same troubles give or take
Main issue is i think a mild translation issue as well as constant minor revisions to both the hardware/software that dont get caught in the instructions
ahhhhh i could totally see that
how do i validate this fan works?
I would suggest to order a BIQU belter tool asap, or, if you have a precision scale, be prepared to print the Gravity Assisted Tensioning System GATS that someone in here developed... Will find link here shortly. @andersbr Is that guy :)
https://www.printables.com/model/1165578-gravity-assisted-tensioning-system-gats-for-v-core
Printables.com
Gravity Assisted Tensioning System (GATS) - For V-Core 4 and 3.1 by...
A streamlined method for precise belt tensioning on the RatRig V-Core 4 and V-Core 3.1 (with front tensioner upgrades). | Download free 3D printable STL models
Fan will turn on once stepper drivers are enabled... So once you make a gantry movement
Fan is on fan is working!
installing the top y belts now
oh that tensioning system is awesome!
Unless you are some kind of tensioning magician, you will not have a good time unless you have one of those two tools :kekw:
far from it so ill def need it hahaha
crap... fan is installed but it happened but took a lot longer to happen..
the fan looks like its going slow but it is set to 24 and shows in the ratOS Shows 100% fan speed
disreguard I was looking at the board wrong and did 5v for the fan.... switch to 24 trying some more calibration
all smooth sailing now
Whats your next steps now?
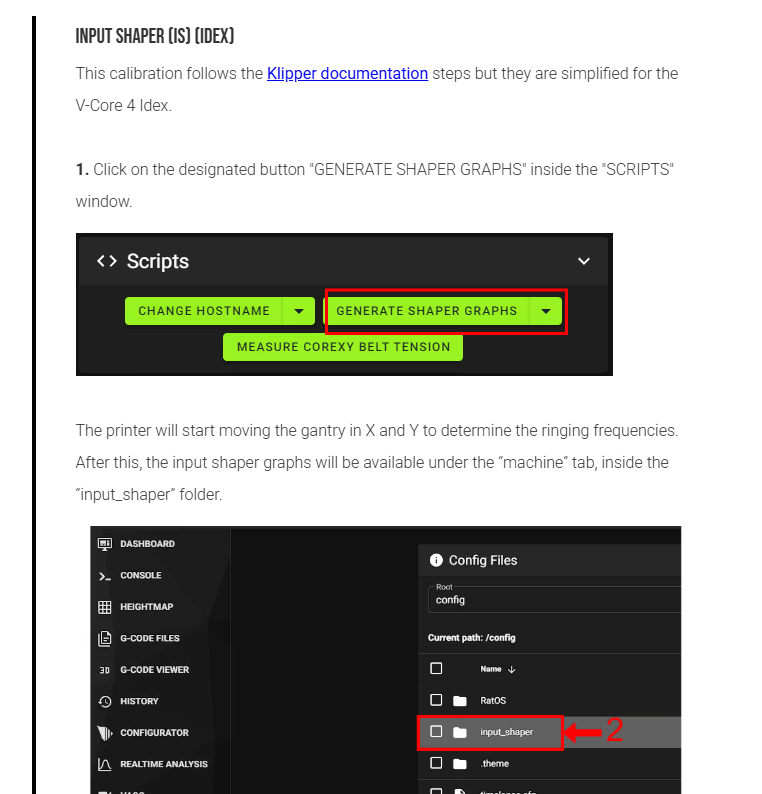
im waiting for the mirror section of the Input Shaper section then on to the HAOC calibration
so the documentation does talk about what to do with the last 2 lines...
[gcode_macro RatOS]
variable_shaper_x_freq: [T0_X, T1_X, COPY_X_AVERAGE, MIRROR_X_AVERAGE]
variable_shaper_y_freq: [T0_Y, T1_Y, COPY_Y_AVERAGE, MIRROR_Y_AVERAGE]
variable_shaper_x_type: ["mzv", "mzv", "mzv", "mzv"]
variable_shaper_y_type: ["mzv", "mzv", "mzv", "mzv"]
So i did my first test print and it seems like after the 3rd layer my filament is no longer being loaded it is just moving around without extruding. tried 2 difirent models and happened on both...check your extruder gears, if you are all the way tensioned down you are probably way too tight
otherwise, check temps
the last two lines you leave alone, they stay MZV because those are the only shapers you should really be using
Ill Try that out. seems to be when the part cooler goes to 100% and almost imediatly stops pulling filiment. turn it down to 50% and it starts moving again
no temp drop it says it is still 210 and holds it good. marked on the extruder part that rotates and it is still spinning.... its defenitly when it goes to 100% and extrusion turns to nothing being extruded
If you are using the black nozzle, that is hardened steel and pure garbage (in my opinion)... It's also 0.6mm not 0.4
50% would be a good fan speed for basic stuff, once you get it dialed in PLA can be printed fast and slightly higher temp with 100% fan
Well damn I'll try the other nozzle then how do I tell it to be 50% and it do that moving forward I'm not interested in going fast yet want to get a good print first 😂
That'd be in your slicer!
I spent a few hours trying to troubleshoot the hardened steel before concluding it does not have the thermal coefficient to keep up with the RatRig, and went back to the brass before upgrading to tungsten carbide (nearly same thermal coefficient as brass). Has been a dream ever since.
thank you that is great to know! would you mind sending the nozzle you got?
seems to be the nozzle was the issue its printing past the 3rd layer now with the other one
https://a.co/d/3Yffy8E
If you swap one nozzle, would suggest the other as different brands/types will have different lengths and throw off your Z offset between nozzles
DUROZZLE Tungsten Carbide Tip E3D V6 Nozzle 0.4mm for Prusa i3 MK3S...
As a metallic alloy, Tungsten Carbide is less brittle than Ruby while having excellent performance in printing highly-abrasive filaments like carbon fiber / glass fiber infused, metal-filled and glow-in-dark materials; It is not only suitable for highly abrasive materials, but also works well wit...
Awesome! thank you ill make sure I match nozzles! it is super awesome the printer is working great now and im even on the multimaterial prints aread after many benchmark prints! thank you for all your help!

FYI, you have the wrong silicone heat sock on, theres a longer one designed for the little nut that's added on :)
but that print looks awesome
Waaa!!!
Hahaha another thing I missed 🤣