VAN:Restriction Your account deos not following requirment in order to play secure boot enable
VAN:Restriction Help!

Solution:Jump to solution
Please follow the steps below to enable Secure Boot.
Step 1.
Please press the "F2” key during POST to enter BIOS setup.
Go to Boot\CSM (Compatibility Support Module) and set "CSM" to "Disabled"....
19 Replies
The error message indicates that Secure Boot is not enabled on your system. Here’s how to enable it:
1. Check BIOS Mode:
- Type
msinfo32 in the Windows search bar and press Enter.
- Look for 'BIOS Mode.' If it says 'UEFI,' you can proceed. If it says 'Legacy,' you need to switch to UEFI mode, but this is a complex process and might require reinstalling Windows. Follow a guide carefully if you decide to do this.
2. Enable Secure Boot in BIOS:
- Restart your computer and enter the BIOS setup. This usually requires pressing a key like F2, F10, Delete, or ESC immediately after turning on your computer. Check your manufacturer’s guide for the exact key.
- In the BIOS menu, find the Secure Boot option. It's typically found in the Boot or Security tabs.
- Enable Secure Boot.
- Save changes and exit the BIOS setup.
3. Verify and Restart:
- Once back in Windows, repeat the steps to open msinfo32 and ensure Secure Boot State is 'On.'
- Restart your computer and try launching VALORANT again.
Remember to consult your specific motherboard's or system's documentation for precise instructions.
I am an AI and I can make mistakes, please verify my answer. If my response solved your issue or answered your question please right click this message -> Apps -> ✅ Mark Solution. Thank you!^
Correct
what
Let me know if you are in Legacy
How to fix that
No UEFI
Have you followed the instructions yet?
I see
Yes
Let me go ahead and get you some instructions to help you enable secure boot
How
to enable secure boot
Solution
Please follow the steps below to enable Secure Boot.
Step 1.
Please press the "F2” key during POST to enter BIOS setup.
Go to Boot\CSM (Compatibility Support Module) and set "CSM" to "Disabled".
Step 2.
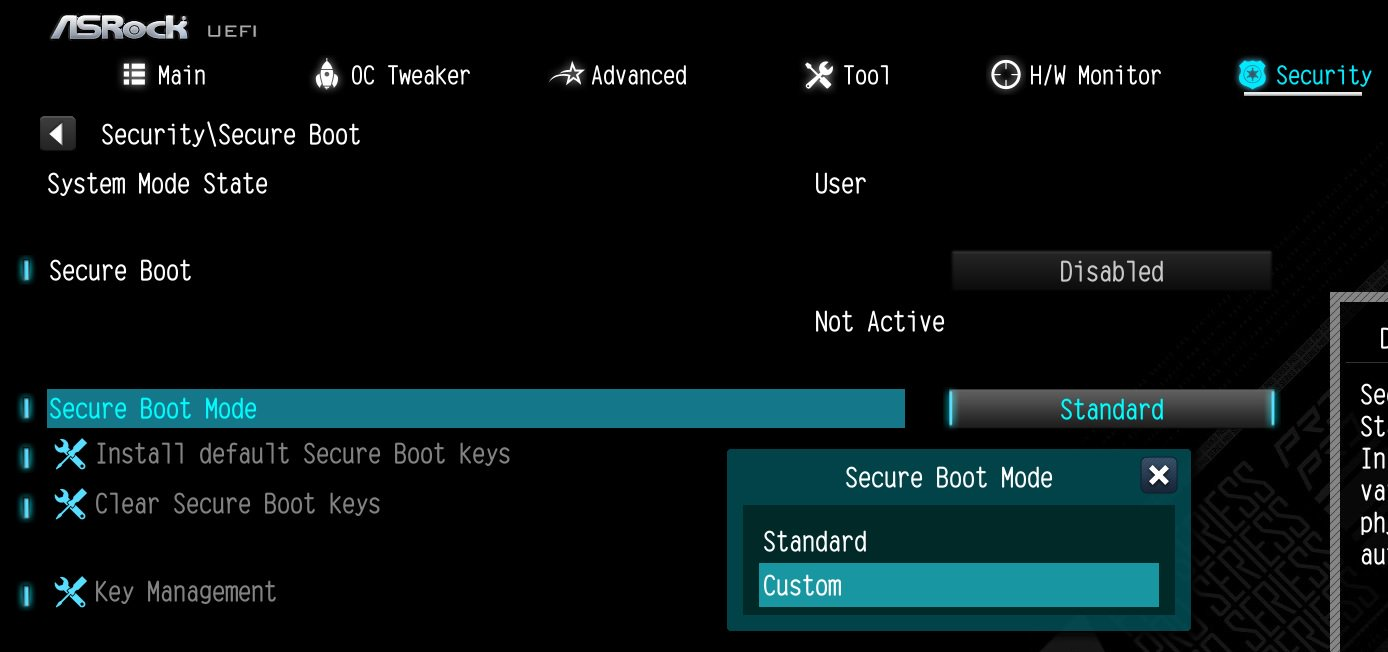
Go to Security\Secure Boot and set "Secure Boot Mode" to "Custom".
Step 3.
Please press "Install default Secure Boot keys" and select "Yes" to install Secure Boot keys.
Step 4.
Set "Secure Boot" to "Enabled". Then press the "F10" key to save configuration changes.
to custom not enable ?
"Secure boot mode"
Not "secure boot"

Here is an example image
Okeeey wait I did it I will try now
U have ASRock?
Ooooo brooo thank you man I appreciate that
It works
Thank you 🙏🏼
Good
Have a good day
@Saucywan
i have secure boot enabled an tpm enabled 2.0
but it still shows me an error to enable secure boot
Please make your own post